= req_context.socket (zmq.REQ)
if (_debug):
assert (req_sock)
rc = req_sock.connect (_REQ_ADDR)
if (_debug):
assert (rc == None)
# create a REP socket
_PROTOCOL = "tcp://"
_SERVER = "127.0.0.1" # localhost
_REP_PORT = ":50247"
_REP_ADDR = _PROTOCOL + _SERVER + _REP_PORT
if (_debug):
print ("'zmq_REQ_REP_server' version 20056.1 binding to:", _REP_ADDR)
rep_context = zmq.Context()
if (_debug):
assert (rep_context)
rep_sock = rep_context.socket (zmq.REP)
if (_debug):
assert (rep_sock)
rc = rep_sock.bind (_REP_ADDR)
if (_debug):
assert (rc == None)
while True:
# Wait for next request from client
data = req_sock.recv()
message = pmt.to_python(pmt.deserialize_str(data))
print("Received request: %s" % message)
output = message.upper()
# Send reply back to client
rep_sock.send (pmt.serialize_str(pmt.to_pmt(output)))
安装 NetCat:方便我们测试 TCP
-《NetCat使用指南》
-《Sending TCP/UDP packets using Netcat》
-《Simple client / server with nc not working》
注意,这鬼软件有好几个不同的软件,我用的是 openbsd-netcat
sudo pacman -S openbsd-netcat
上面代码:
| kind |
port |
method |
func |
C/S |
| REQ |
50246 |
connect |
recv() |
server |
| REP |
50247 |
bind |
send() |
client |
while 循环中用 REQ 等待接收,然后转为大写,用 REP 发送出去:(比较坑的是,我用 netcat 建立 tcp 服务器和客户端,无法与上面 python 脚本通信,似乎一启动,建立连接,server 就异常退出了,最终还是得用 GNN Radio 开启两个 ZMQ 工程,然后与这个 python 脚本通信,整体信息流如下:)

4.4 作为 PUSH/PULL 服务器的 Python 程序
与上面 demo 类似,是基于 PUSH/PULL 传递消息。
#!/usr/bin/python3
# -*- coding: utf-8 -*-

# zmq_PUSH_PULL_server.py

import sys
import pmt
import zmq

_debug = 0          # set to zero to turn off diagnostics

# create a PUSH socket
_PROTOCOL = "tcp://"
_SERVER = "127.0.0.1"          # localhost
_PUSH_PORT = ":50252"
_PUSH_ADDR = _PROTOCOL + _SERVER + _PUSH_PORT
if (_debug):
    print ("'zmq_PUSH_PULL_server' version 20068.1 binding to:", _PUSH_ADDR)
push_context = zmq.Context()
if (_debug):
    assert (push_context)
push_sock = push_context.socket (zmq.PUSH)
if (_debug):
    assert (push_sock)
rc = push_sock.bind (_PUSH_ADDR)
if (_debug):
    assert (rc == None)

# create a PULL socket
_PROTOCOL = "tcp://"
_SERVER = "127.0.0.1"          # localhost
_PULL_PORT = ":50251"
_PULL_ADDR = _PROTOCOL + _SERVER + _PULL_PORT
if (_debug):
    print ("'zmq_PUSH_PULL_server' connecting to:", _PULL_ADDR)
pull_context = zmq.Context()
if (_debug):
    assert (pull_context)
pull_sock = pull_context.socket (zmq.PULL)
if (_debug):
    assert (pull_sock)
rc = pull_sock.connect (_PULL_ADDR)
if (_debug):
    assert (rc == None)

while True:
    #  Wait for next request from client
    data = pull_sock.recv()
    message = pmt.to_python(pmt.deserialize_str(data))
    # print("Received request: %s" % message)

    output = message.upper()    # capitalize message

    #  Send reply back to client
    push_sock.send (pmt.serialize_str(pmt.to_pmt(output)))
4.5 处理流程图数据的 Python 程序
个 demo 是几乎贯穿后面 GNU Radio 高阶用法的最重要的 DEMO。 因为,通常情况下我们会使用 GNU Radio 进行信号处理,但希望数据流流入普通 python 程序,然后做丰富的数据分析等逻辑。这里,PUB 和 PUSH 可以让应用程序获得这些数据流。(这里我们将 127.0.0.1 换成了 *,这样能够让同一局域网内的设备都能访问)
一般的,流程图中采用 PUB/PUSH Sink,将数据送出:
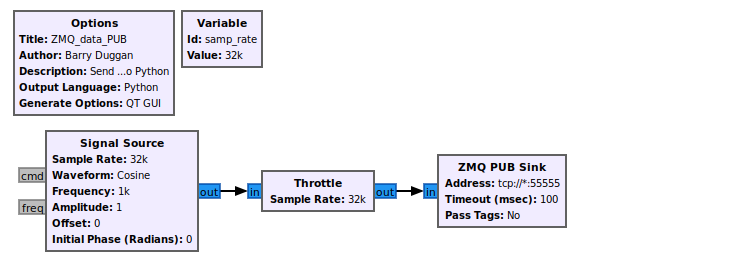
然后,普通 python 脚本就可以对其进行 recv:
#!/usr/bin/python3
# -*- coding: utf-8 -*-

# zmq_SUB_proc.py
# Author: Marc Lichtman

import zmq
import numpy as np
import time
import matplotlib.pyplot as plt

context = zmq.Context()
socket = context.socke