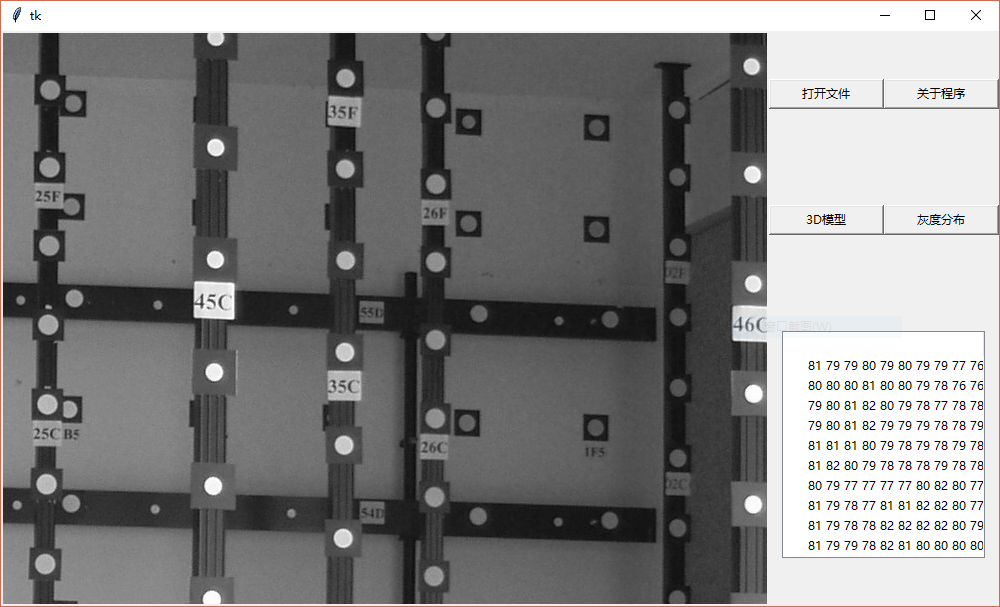
UI界面展示:
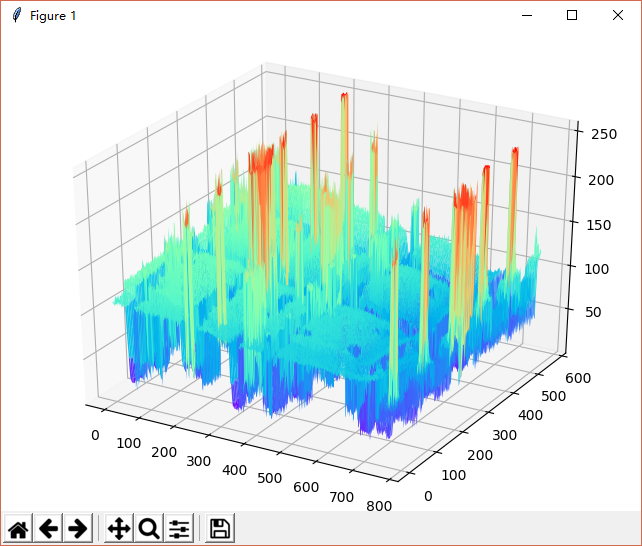
3D模型界面:
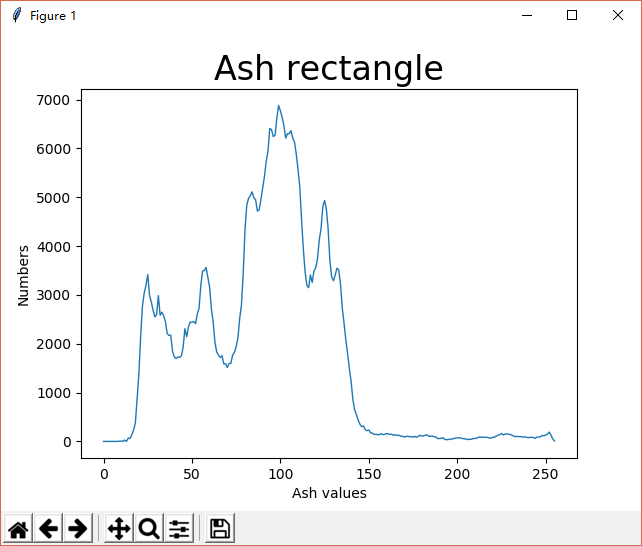
灰度分布界面:
下面是源程序:
#-*- coding:utf-8 -*-
# edited by Mufasa

import tkinter as tk
import tkinter.filedialog
from PIL import Image, ImageTk
import numpy as np
from  tkinter import ttk
import time,threading
import matplotlib.pyplot as plt
from mpl_toolkits.mplot3d import Axes3D
from tkinter import messagebox

'''
全局变量:
root
im
data
测试用照片格式:(575, 768)前行后列
'''

class main_:
    def callBack(event):
        print(event.y,event.x)
    def button_():
        global root
        btn_select = tk.Button(root,text='打开文件',width=15,command=assist_.select).grid(row=0,column=1)
        btn_about = tk.Button(root,text='关于程序',width=15,command=assist_.about).grid(row=0,column=2)

    def tree_():
        global tree
        tree = ttk.Treeview(root)
        tree.grid(row=2,column=1,columnspan=2)
        thread_1 = threading.Thread(target=assist_.add_delete_tree)#
        thread_1.start()

    def canvas_():
        global root,path,data,im
        image = Image.open(path)

        im = ImageTk.PhotoImage(image)
        data = np.array(image)

        canvas = tk.Canvas(root,width = data.shape[1]-4,height =data.shape[0]-4,bg = 'white')
        canvas.create_image(data.shape[1]/2,data.shape[0]/2,image = im)
        canvas.grid(row=0,column=0,rowspan=3)
        canvas.bind("<Motion>",assist_.gain_yx)
        main_.tree_()

class assist_:
    def select():
        global data,path,root    #data是图像的灰度值
        path = tkinter.filedialog.askopenfilename(initialdir = '',filetypes=( ("Audio files", "*.jpg;*.bmp"),("All files", "*.*")))    #path全局化没有必要
        btn_3D = tk.Button(root,text='3D模型',width=15,command=assist_._3D_out).grid(row=1,column=1)
        btn_2D = tk.Button(root,text='灰度分布',width=15,command=assist_._2D_out).grid(row=1,column=2)
        main_.canvas_()

    def gain_yx(event):
        global site_yx
        site_yx = [event.y,event.x]    #实时更新,site_yx的数据
        # print(site_yx)

    def add_delete_tree():
        global tree,site_yx
        while True:
            if site_yx[0]>=5 and site_yx[0]<=data.shape[0]-6 and site_yx[1]>=5 and site_yx[1]<=data.shape[1]-6:
                for i in range(10):
                    string = ''
                    for j in range(10):
                        string = string + " " + str(data[site_yx[0]-5+j,site_yx[1]-5+i])
                    tree.insert("",0,str(i),text=string,values=("1"))

                time.sleep(0.3)
                for i in range(10):
                    tree.delete(str(i))

    def _3D_out():
        global data
        fig = plt.figure()
        ax = Axes3D(fig)
        x = [i for i in range(len(data[0]))]
        y = [j for j in range(len(data))]

        X = np.mat(x)
        Y = np.mat(y)
        X, Y = np.meshgrid(X, Y)    #变成二维矩阵
        Z = np.mat(data)
        ax.plot_surface(X, Y, Z, rstride=5, cstride=5, cmap='rainbow')
        plt.show()

    def _2D_out():
        global data
        d_array = [0]*256
        for i in data:
            for j in i:
                d_array[j] = d_array[j] + 1
        plt.title(u"Ash rectangle",fontsize=24)
        plt.xlabel("Ash values",fontsize=10)
        plt.ylabel("Numbers",fontsize=10)
        plt.plot(d_array,linewidth=1)
        plt.show()

    def about():
        tk.messagebox.showinfo(title='关于程序', message=(
        '程序名称:灰度整列显示\n程序平台:python3.6\n编辑者:Mufasa\n编辑时间:2017.12.23\n\n主要功能:\n1)灰度矩阵显示\n2)灰度直方图显示\n3)3D图谱模型显示'
        ))

global root,data,path,im,site_yx,tree
site_yx = [50,50]
root = tk.Tk()
main_.button_()
root.mainloop()
下一个任务:进行边界检测
思路:
- 使用EM算法对图像的灰度分布进行分析;
- 将图像灰度 由256个等级降低;
- 边界检测算法检测;
- 边界高光凸显。
文中图片 链接:链接:https://pan.baidu.com/s/1hsImLla 密码:m2ip