版权声明:本文为博主原创文章,未经博主允许不得转载。 https://blog.csdn.net/Androidlushangderen/article/details/51591134
前言
数据的安全性是一直被大家所重视的.对于一个存有大规模数据量的成熟企业来说,如何做到数据不丢失,不损坏,不窃取就显得格外重要了.而HDFS恰恰满足了”海量数据规模”的特点,所以如果我们用HDFS存储大量的非结构化的数据,我们如何保证其中数据的安全性呢 在之前的文章中,有提到过一个”Encryption Zone ”数据加密空间的概念.Encryption Zone可以保证用户在指定的加密空间路径下,数据是被加/解密的,而且对于用户来说完全透明 .详细信息可点击HDFS数据加密空间 .但是其实再仔细分析数据加密空间的原理,你会发现他其实是一个局部数据安全处理的过程.因为他有一个路径空间的限制 .而且我要每次创建我想要加密的特定路径.那么在HDFS中是否还有其他的安全认证机制,可以弥补这点,做到全局的数据验证呢本文就带大家了解HDFS中2大验证体系BlockToken验证和Sasl认证.
BlockToken验证
首先介绍的验证机制是BlockToken验证,因为相比较而言,BlockToken验证比Sasl确实也要简单一些.而且BlockToken在Sasl中也会被用到.细看BlockToken 这个词,可以被拆分为2个词,Block,Token.我们可以得出以下2点关键信息.
1. BlockToken是针对Block 块级别的验证.
2. Token的意思是令牌的意思,基本是用做访问时的验证.OK,大体有了这么一个理解之后,继续来看一下BlockToken如何做具体的验证的,要解决这个问题,需要弄清楚下面3个问题:
BlockToken如何生成的
BlockToken在哪里被验证
BlockToken如何被验证的
在下面的阐述中,将会一一揭开这些答案.
BlockToken的结构分析
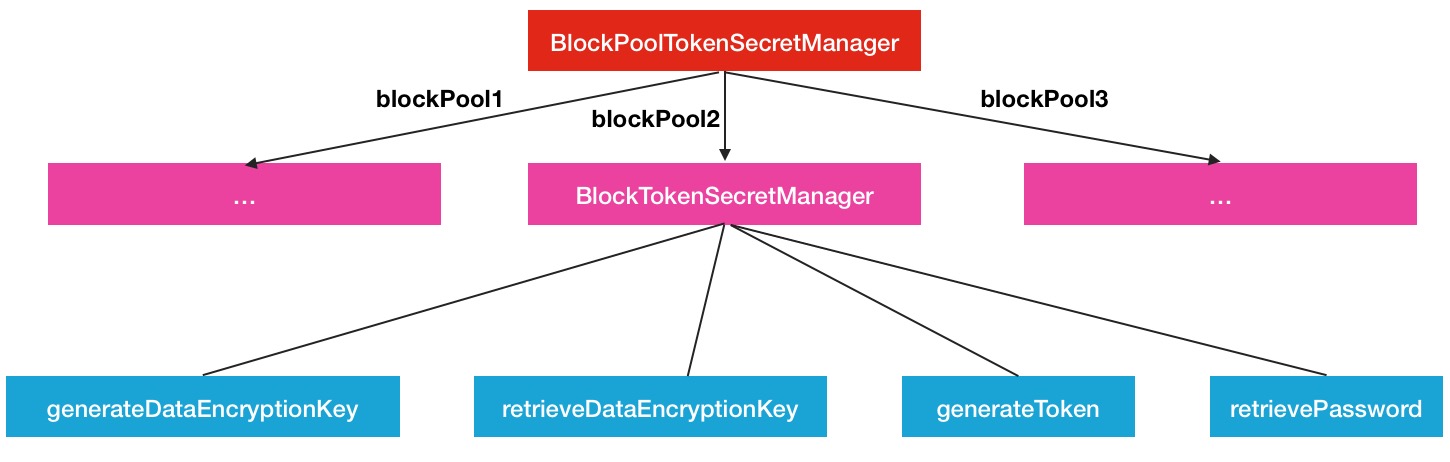
BlockToken的体系结构分析可以帮助我们了解他是如何产生的.如果你仔细观察,查找的话,应该很容易就找到相关类,就是BlockPoolTokenSecretManager .BlockToken就是由这个类调用产生的.但是真正产生BlockToken的操作其实是由其存储的BlockTokenSecretManager做的.所以这里就有一层关系:
BlockPoolTokenSecretManager包含BlockTokenSecretManager,并且每一个blockPool对应一个BlockTokenSecretManager最终是如下的map存储关系.
private final Map < String , BlockTokenSecretManager> map =
new HashMap< String , BlockTokenSecretManager> ();可能会有人有疑问了,为什么按照BlockPool分出这么多的BlockTokenSecretManager,全局维护一个Manager不是更好吗我的个人看法是HDFS这么做还是想做隔离,blockPool是在每次NameNode做format时产生的,代表着独立的存储空间.所有的Block在各自所属的BlockPool下是全局唯一的.HDFS中是可以有多个BlockPool的. .回到前面说的过程,重新来看一下BlockToken的生成调用过程.
/**
* See {@link BlockTokenSecretManager#generateToken(ExtendedBlock, EnumSet)}
*/
public Token<BlockTokenIdentifier> generateToken (ExtendedBlock b,
EnumSet<AccessMode> of) throws IOException {
return get(b.getBlockPoolId()).generateToken(b, of);
}然后进行实际调用方法
/** Generate an block token for current user */
public Token<BlockTokenIdentifier> generateToken (ExtendedBlock block,
EnumSet<BlockTokenIdentifier.AccessMode> modes) throws IOException {
UserGroupInformation ugi = UserGroupInformation.getCurrentUser();
String userID = (ugi == null null : ugi.getShortUserName());
return generateToken(userID, block, modes);
}
/** Generate a block token for a specified user */
public Token<BlockTokenIdentifier> generateToken (String userId,
ExtendedBlock block, EnumSet<BlockTokenIdentifier.AccessMode> modes) throws IOException {
BlockTokenIdentifier id = new BlockTokenIdentifier(userId, block
.getBlockPoolId(), block.getBlockId(), modes);
return new Token<BlockTokenIdentifier>(id, this );
}blockToken在创建block块的时候,会被构建
private LocatedBlock createLocatedBlock (final BlockInfo blk, final long pos,
final AccessMode mode) throws IOException {
final LocatedBlock lb = createLocatedBlock(blk, pos);
if (mode != null ) {
setBlockToken(lb, mode);
}
return lb;
}进入setBlockToken方法
public void setBlockToken (final LocatedBlock b,
final AccessMode mode) throws IOException {
if (isBlockTokenEnabled()) {
if (b.isStriped()) {
Preconditions.checkState(b instanceof LocatedStripedBlock);
LocatedStripedBlock sb = (LocatedStripedBlock) b;
byte [] indices = sb.getBlockIndices();
Token<BlockTokenIdentifier>[] blockTokens = new Token[indices.length];
ExtendedBlock internalBlock = new ExtendedBlock(b.getBlock());
for (int i = 0 ; i < indices.length; i++) {
internalBlock.setBlockId(b.getBlock().getBlockId() + indices[i]);
blockTokens[i] = blockTokenSecretManager.generateToken(
NameNode.getRemoteUser().getShortUserName(),
internalBlock, EnumSet.of(mode));
}
sb.setBlockTokens(blockTokens);
} else {
b.setBlockToken(blockTokenSecretManager.generateToken(
NameNode.getRemoteUser().getShortUserName(),
b.getBlock(), EnumSet.of(mode)));
}
}
}这就是blockToken从产生到被设置到目标对象的过程,但是上面同时标注了一点:
if (isBlockTokenEnabled())也就是说,blockToken功能是可控的,他是一个受配置控制的功能.具体的配置项后面会具体说明.综上所述,在这个部分,我们基本上了解了BlockToken相关的结构设计以及相关的方法,图形展示效果如下.
BlockToken的调用与验证
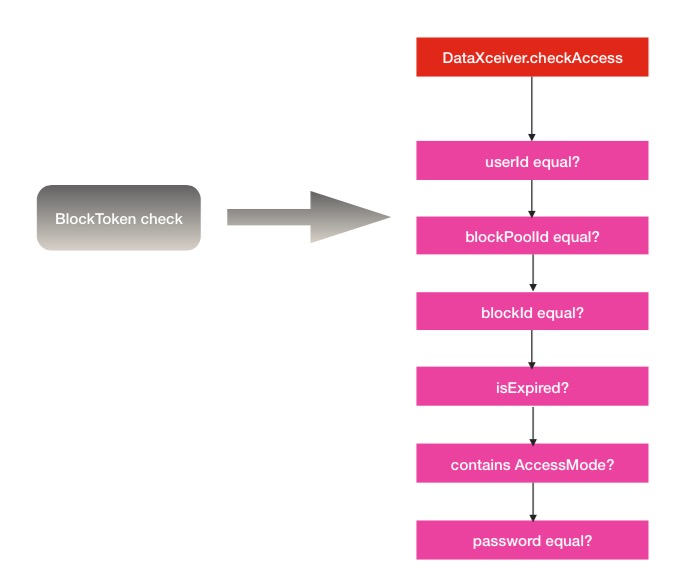
BlockToken的验证方法是由BlockTokenSecretManager的checkAccess方法执行的.所以我们只要找到这个方法在哪里被调用即可.通过寻找,答案就在DataXceiver中.DataXceiver是一个数据处理中心,他会接收各种block操作命令,然后执行对应的处理方法,而在readBlock,writeBlock的执行前几步操作中,就包含了blockToken的验证操作 .以readBlock方法为例.
public void readBlock (final ExtendedBlock block,
final Token<BlockTokenIdentifier> blockToken,
final String clientName,
final long blockOffset,
final long length,
final boolean sendChecksum,
final CachingStrategy cachingStrategy) throws IOException {
previousOpClientName = clientName;
long read = 0 ;
updateCurrentThreadName("Sending block " + block);
OutputStream baseStream = getOutputStream();
DataOutputStream out = getBufferedOutputStream();
checkAccess(out, true , block, blockToken,
Op.READ_BLOCK, BlockTokenIdentifier.AccessMode.READ);
...进入checkAccess方法
private void checkAccess (OutputStream out, final boolean reply,
final ExtendedBlock blk,
final Token<BlockTokenIdentifier> t,
final Op op,
final BlockTokenIdentifier.AccessMode mode) throws IOException {
checkAndWaitForBP(blk);
if (datanode.isBlockTokenEnabled) {
if (LOG.isDebugEnabled()) {
LOG.debug("Checking block access token for block '" + blk.getBlockId()
+ "' with mode '" + mode + "'" );
}
try {
datanode.blockPoolTokenSecretManager.checkAccess(t, null , blk, mode);
} catch (InvalidToken e) {
...然后在最终的checkAceess方法中,会进行多指标维度的信息验证.
/** Check if access should be allowed. userID is not checked if null */
public void checkAccess (Token<BlockTokenIdentifier> token, String userId,
ExtendedBlock block, BlockTokenIdentifier.AccessMode mode) throws InvalidToken {
BlockTokenIdentifier id = new BlockTokenIdentifier();
try {
id.readFields(new DataInputStream(new ByteArrayInputStream(token
.getIdentifier())));
} catch (IOException e) {
throw new InvalidToken(
"Unable to de-serialize block token identifier for user=" + userId
+ ", block=" + block + ", access mode=" + mode);
}
checkAccess(id, userId, block, mode);
if (!Arrays.equals(retrievePassword(id), token.getPassword())) {
throw new InvalidToken("Block token with " + id.toString()
+ " doesn't have the correct token password" );
}
}继续进入中间的id,userId验证方法
public void checkAccess (BlockTokenIdentifier id, String userId,
ExtendedBlock block, BlockTokenIdentifier.AccessMode mode) throws InvalidToken {
if (LOG.isDebugEnabled()) {
LOG.debug("Checking access for user=" + userId + ", block=" + block
+ ", access mode=" + mode + " using " + id.toString());
}
if (userId != null && !userId.equals(id.getUserId())) {
throw new InvalidToken("Block token with " + id.toString()
+ " doesn't belong to user " + userId);
}
if (!id.getBlockPoolId().equals(block.getBlockPoolId())) {
throw new InvalidToken("Block token with " + id.toString()
+ " doesn't apply to block " + block);
}
if (id.getBlockId() != block.getBlockId()) {
throw new InvalidToken("Block token with " + id.toString()
+ " doesn't apply to block " + block);
}
if (isExpired(id.getExpiryDate())) {
throw new InvalidToken("Block token with " + id.toString()
+ " is expired." );
}
if (!id.getAccessModes().contains(mode)) {
throw new InvalidToken("Block token with " + id.toString()
+ " doesn't have " + mode + " permission" );
}
}所以通过上述过程的分析,可以看得出BlockToken的验证是非常严格的,一旦token中某个指标信息不匹配,马上抛出异常,后续的方法也随之无法进行 .HDFS将blockToken验证处理放在DataXceiver中,进行全局的控制,显然是作者精密思考的选择.下面是BlockToken验证的流程示意图.
BlockToken验证配置
下面简单提一下BlockToken的配置控制,配置名称如下
dfs.block .access .token .enable 默认不开启,就是false.当然如果你为了安全性,启用了block验证的功能,势必会对HDFS的block读写性能造成影响,因为里面有一些反序列化操作,还有很多的验证操作,而且是在频繁的block块操作中每次都会进行 .
HDFS的Sasl认证
下半部分将关注点移向HDFS中的另外一套认证体系,Sasl.说起Sasl,他不是HDFS所特有的,他是一套公开的验证机制,全称是Simple Authentication and Security Layer ,中文翻译为简单认证与安全层 .在百度百科中的解释如下
一种用来扩充C /S模式验证能力的机制那么在HDFS中的Sasl与平常我们所说的Sasl机制有什么不同呢下面是我的个人理解:
HDFS内部的Sasl与平常所说的Sasl没有本质的区别,只是将Sasl认证体系整合进了HDFS的数据读写中所以如果你之前了解过Sasl,或者用过这套体系,可能后面的内容你会非常容易理解.在下面的内容中,主要选出了Sasl与HDFS结合的部分进行分析,不致于分析的过细,过深.
SaslClient与SaslServer的handshake
上文中已经介绍过,Sasl是C/S模式的认证机制,所以自然的会分出2个角色,SaslClient,SaslServer.而在每次的数据传输中,客户端与服务端都会进行一次handshake .比如在DataStreamer的transfer方法中.
private void transfer(final DatanodeInfo src, final DatanodeInfo[] targets,
final StorageType[] targetStorageTypes,
final Token<BlockTokenIdentifier> blockToken)
throws IOException {
Socket sock = null ;
DataOutputStream out = null ;
DataInputStream in = null ;
try {
sock = createSocketForPipeline(src, 2 , dfsClient);
final long writeTimeout = dfsClient.getDatanodeWriteTimeout(2 );
int multi = 2 + (int )(bytesSent /dfsClient.getConf().getWritePacketSize())
/ 200 ;
final long readTimeout = dfsClient.getDatanodeReadTimeout(multi);
OutputStream unbufOut = NetUtils.getOutputStream(sock, writeTimeout);
InputStream unbufIn = NetUtils.getInputStream(sock, readTimeout);
IOStreamPair saslStreams = dfsClient.saslClient.socketSend(sock,
unbufOut, unbufIn, dfsClient, blockToken, src);
unbufOut = saslStreams.out ;
unbufIn = saslStreams.in ;
...略过dfsClient.saslClient的中间处理方法,进入最终handshake处理方法.
private IOStreamPair send(InetAddress addr, OutputStream underlyingOut,
InputStream underlyingIn, DataEncryptionKey encryptionKey,
Token<BlockTokenIdentifier> accessToken, DatanodeID datanodeId)
throws IOException {
if (encryptionKey != null ) {
LOG.debug ("SASL client doing encrypted handshake for addr = {}, "
+ "datanodeId = {}" , addr, datanodeId);
return getEncryptedStreams(addr, underlyingOut, underlyingIn,
encryptionKey);
} else if (!UserGroupInformation.isSecurityEnabled()) {
LOG.debug ("SASL client skipping handshake in unsecured configuration for "
+ "addr = {}, datanodeId = {}" , addr, datanodeId);
return null ;
} else if (SecurityUtil.isPrivilegedPort(datanodeId.getXferPort())) {
LOG.debug (
"SASL client skipping handshake in secured configuration with "
+ "privileged port for addr = {}, datanodeId = {}" ,
addr, datanodeId);
return null ;
} else if (fallbackToSimpleAuth != null && fallbackToSimpleAuth.get()) {
LOG.debug (
"SASL client skipping handshake in secured configuration with "
+ "unsecured cluster for addr = {}, datanodeId = {}" ,
addr, datanodeId);
return null ;
} else if (saslPropsResolver != null ) {
LOG.debug (
"SASL client doing general handshake for addr = {}, datanodeId = {}" ,
addr, datanodeId);
return getSaslStreams(addr, underlyingOut, underlyingIn, accessToken);
} else {
LOG.debug ("SASL client skipping handshake in secured configuration with "
+ "no SASL protection configured for addr = {}, datanodeId = {}" ,
addr, datanodeId);
return null ;
}
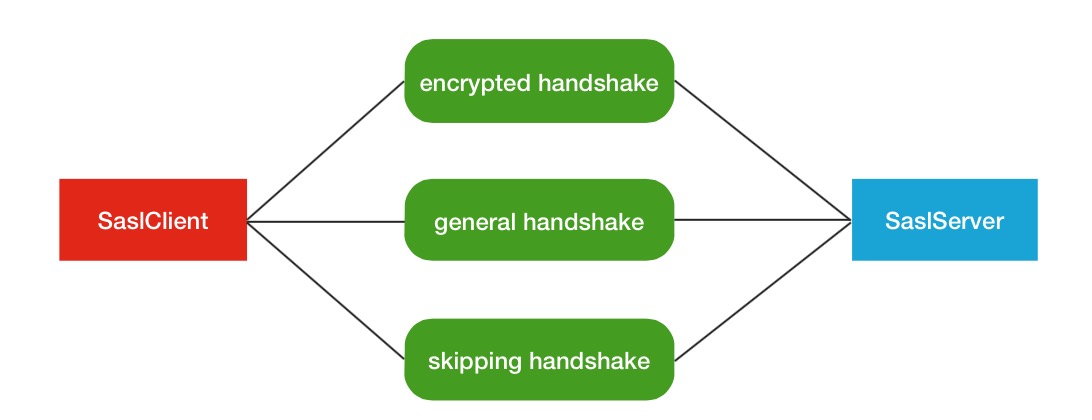
}这里会进行多重因素的判断,以此决定用何种handshake握手方式.大体分为以下几种:
加密key不为空,进行encrypted handshake.
未开启安全配置模式,不做handshake.
Sasl相关配置项不为空,进行普通handshake.
如果是特权端口号,不做handshake.
如果是简单认证模式,则不做handshake.
其他情况,同样不做handshake.
所以真正做handshake的就2种情况,如下图所示.
如果你什么安全配置都没有开启的话,也就是延用默认值的情况,握手逻辑将从第二个判断逻辑中被跳过.
DoSaslHandshake
在这2类进入真正handshake阶段的方法中,会提前一步进行用户,密码的构造过程.
首先是encrypted handshake 的构造过程.
private IOStreamPair getEncryptedStreams (InetAddress addr,
OutputStream underlyingOut,
InputStream underlyingIn, DataEncryptionKey encryptionKey)
throws IOException {
Map<String, String> saslProps = createSaslPropertiesForEncryption(
encryptionKey.encryptionAlgorithm);
LOG.debug("Client using encryption algorithm {}" ,
encryptionKey.encryptionAlgorithm);
String userName = getUserNameFromEncryptionKey(encryptionKey);
char [] password = encryptionKeyToPassword(encryptionKey.encryptionKey);
CallbackHandler callbackHandler = new SaslClientCallbackHandler(userName,
password);
return doSaslHandshake(addr, underlyingOut, underlyingIn, userName,
saslProps, callbackHandler);
}第二个是general handshake 的构造过程.
private IOStreamPair getSaslStreams (InetAddress addr,
OutputStream underlyingOut, InputStream underlyingIn,
Token<BlockTokenIdentifier> accessToken)
throws IOException {
Map<String, String> saslProps = saslPropsResolver.getClientProperties(addr);
String userName = buildUserName(accessToken);
char [] password = buildClientPassword(accessToken);
CallbackHandler callbackHandler = new SaslClientCallbackHandler(userName,
password);
return doSaslHandshake(addr, underlyingOut, underlyingIn, userName,
saslProps, callbackHandler);
}上述2个过程中有共同的细节处理.
生成的用户名,密码都被base64编码处理过比如其中的一个例子
public static char [] encryptionKeyToPassword (byte [] encryptionKey) {
return new String(Base64.encodeBase64(encryptionKey, false ), Charsets.UTF_8)
.toCharArray();
}base64编码的处理可以防止明文的暴露 . 客户端与服务端将会进行身份信息的交换认证 .
首先是SaslClient端发起的,这里直接贴上全部执行逻辑代码
private IOStreamPair doSaslHandshake(InetAddress addr,
OutputStream underlyingOut, InputStream underlyingIn, String userName,
Map<String, String> saslProps,
CallbackHandler callbackHandler) throws IOException {
...
try {
// Start of handshake - "initial response" in SASL terminology.
sendSaslMessage(out, new byte[0 ]);
// step 1
byte[] remoteResponse = readSaslMessage(in );
byte[] localResponse = sasl.eva luateChallengeOrResponse(remoteResponse);
//...
sendSaslMessageAndNegotiationCipherOptions(out, localResponse,
cipherOptions);
// step 2 (client-side only)
SaslResponseWithNegotiatedCipherOption response =
readSaslMessageAndNegotiatedCipherOption(in );
localResponse = sasl.eva luateChallengeOrResponse(response.payload);
assert localResponse == null;
// SASL handshake is complete
checkSaslComplete(sasl, saslProps);
...
// If negotiated cipher option is not null, we will use it to create
// stream pair.
return cipherOption != null createStreamPair(
conf, cipherOption, underlyingOut, underlyingIn, false) :
sasl.createStreamPair(out, in );
} catch (IOException ioe) {
sendGenericSaslErrorMessage(out, ioe.getMessage());
throw ioe;
}
}然后是对应的SaslServer处理回应阶段
private IOStreamPair doSaslHandshake(Peer peer, OutputStream underlyingOut,
InputStream underlyingIn, Map<String, String> saslProps,
CallbackHandler callbackHandler) throws IOException {
//...
try {
// step 1
byte[] remoteResponse = readSaslMessage(in );
byte[] localResponse = sasl.eva luateChallengeOrResponse(remoteResponse);
sendSaslMessage(out, localResponse);
// step 2 (server-side only)
List<CipherOption> cipherOptions = Lists.newArrayList();
remoteResponse = readSaslMessageAndNegotiationCipherOptions(
in , cipherOptions);
localResponse = sasl.eva luateChallengeOrResponse(remoteResponse);
// SASL handshake is complete
checkSaslComplete(sasl, saslProps);
...
// If negotiated cipher option is not null, we will use it to create
// stream pair.
return cipherOption != null createStreamPair(
dnConf.getConf(), cipherOption, underlyingOut, underlyingIn, true) :
sasl.createStreamPair(out, in );
} catch (IOException ioe) {
...
}
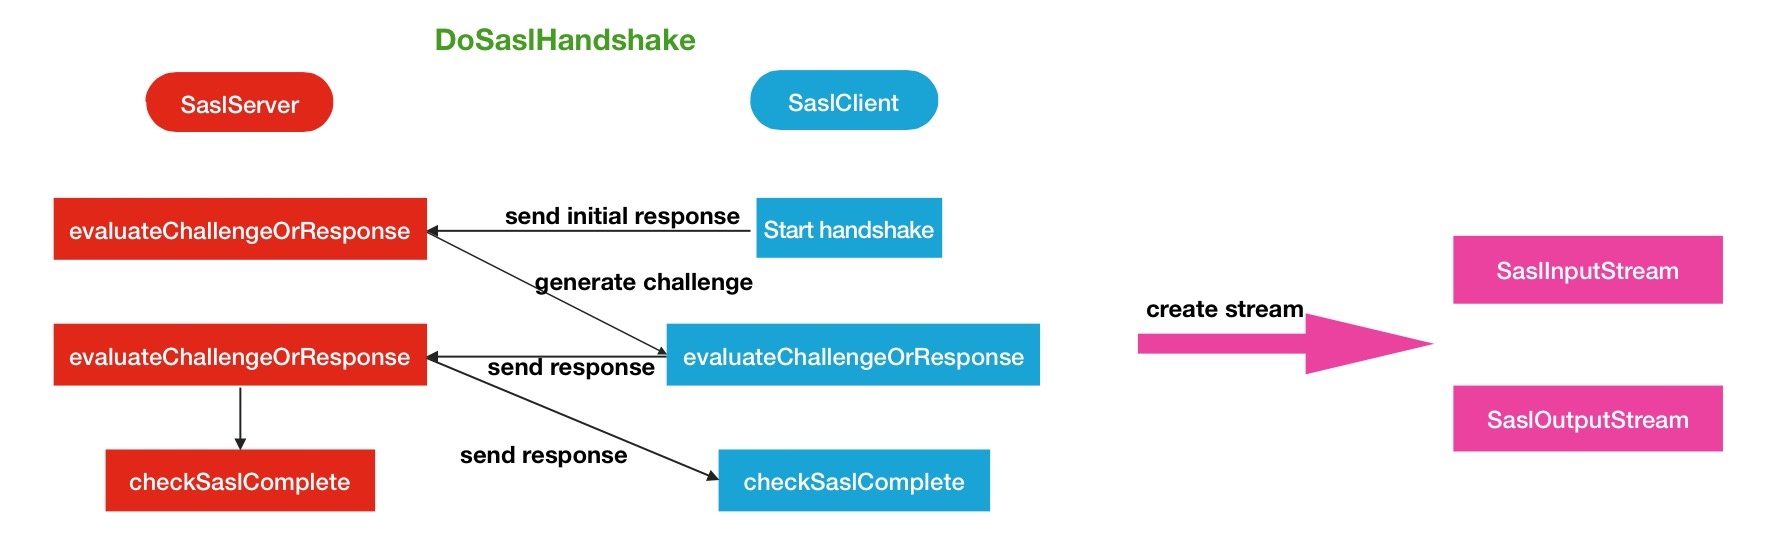
}在握手协议完成之后,这里将会得到一个新的输入输出流对象.如果你cipher option加密参数没配置的话,将会默认使用SaslInputStream和SaslOutputStream .此部分的Sasl逻辑与平常我们所说的Sasl基本一致.下面是对应的流程图帮助大家理解.
大致描述一下图中doSaslHandshake所示的过程
第一步,首先client发送初始请求.
第二步,server端收到请求,并生成challenge询问,发送给client.
第三步,client收到challenge询问,并处理询问,生成response回复,发送给server.
第四步,server端收到询问回复,并验证回复,验证通过后,再给client端一个响应回复,进行确认.
第五步,双方都确认完毕,handshake握手结束.
当然,在handshake阶段如果发生了失败或异常,同样会导致后续操作的失败.
现在又有一个问题出现在了我们的面前,全新的输入输出流对象,SaslInputStream和SaslOutputStream,和原来的对象有什么不同呢
A SaslInputStream is composed of an InputStream and a SaslServer (or
SaslClient) so that read () methods return data that are read in from the
underlying InputStream but have been additionally processed by the SaslServer
(or SaslClient) object. The SaslServer (or SaslClient) object must be fully
initialized before being used by a SaslInputStream.也就是说,他需要被SaslClient或者SaslServer进行额外的处理 .从源码中,我们也可以找到这里所指的”additionally processed”部分的代码.
public void write (byte [] inBuf, int off, int len) throws IOException {
if (!useWrap) {
outStream.write(inBuf, off, len);
return ;
}
try {
if (saslServer != null ) {
saslToken = saslServer.wrap(inBuf, off, len);
} else {
saslToken = saslClient.wrap(inBuf, off, len);
}
} catch (SaslException se) {
...然后是SalsInputStream读数据时的处理
private int readMoreData() throws IOException {
//...
try {
if (saslServer != null) { // using saslServer
obuffer = saslServer.unwrap(saslToken, 0 , saslToken.length);
} else { // using saslClient
obuffer = saslClient.unwrap(saslToken, 0 , saslToken.length);
}
} catch (SaslException se) {
... 从上述的方法名中来看,这恰好是一次包装/解包装的过程,并不是加/解密的过程.最终在jdk中的SaslServer中有了操作方法的声明.
incoming is the contents of the SASL buffer as defined in RFC 2222
without the leading four octet field that represents the length .这里可以理解为warp方法将会对输入内容进行重新编码保存.
还是之前提过的那句话,如果你什么安全配置都没开启的话,这些过程都不会经过,还是会按照原来普通的输入,输出流进行数据读写操作 .
BlockToken验证与HDFS的Sasl认证异同
以上内容就是本文所主要阐述的HDFS内部的2大认证体系,其中HDFS的Sasl只是讲了个大概,内部的诸多细节还是很多的,有兴趣的同学可以自行研究.下面对文中所述的2个验证体系做一下对比.
共同点:
没有空间局部的限制,数据全局的验证.
都会对数据读写效率造成一定幅度的性能影响.
不同点:
验证维度不同.BlockToken验证,验证粒度较细,针对block级别的验证,会对每次的block操作做验证.Sasl则是针对每次数据传输做认证.
复杂性不同.BlockToken的验证过程相对简单,清晰.而Sasl认证体系则复杂一些,中间会经过handshake握手阶段,而且中间可以配置相关的Qop保护级别的参数.论完整度而言,Sasl比blockToken更加完整化,体系化一些.
参考链接
1.http://docs.oracle.com/ java se/jndi/tutorial/ldap/security/sasl.html 百度百科.Sasl