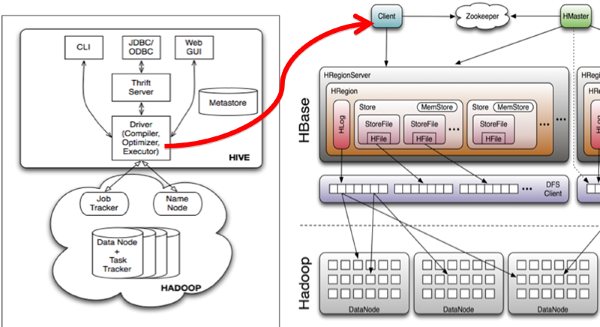
Hive是基于Hadoop的一个数据仓库工具,可以将结构化的数据文件映射为一张数据库表,并提供完整的sql查询功能,可以将sql语句转换为MapReduce任务进行运行。 其优点是学习成本低,可以通过类SQL语句快速实现简单的MapReduce统计,不必开发专门的MapReduce应用,十分适合数据仓库的统计分析。
Hive与HBase的整合功能的实现是利用两者本身对外的API接口互相进行通信,相互通信主要是依靠hive_hbase-handler.jar工具类, 大致意思如图所示:
-
<xmlversion="1.0">
-
<xml-stylesheettype="text/xsl"href="configuration.xsl">
-
<configuration>
-
-
-
-
<property>
-
<name>hive.exec.reducers.bytes.per.reducer</name>
-
<value>1000000000</value>
-
<description>sizeperreducer.Thedefaultis1G,i.eiftheinputsizeis10G,itwilluse10reducers.</description>
-
</property>
-
-
<property>
-
<name>hive.exec.reducers.max</name>
-
<value>999</value>
-
<description>maxnumberofreducerswillbeused.Iftheone
-
specifiedintheconfigurationparametermapred.reduce.tasksis
-
negative,hivewillusethisoneasthemaxnumberofreducerswhen
-
automaticallydeterminenumberofreducers.</description>
-
</property>
-
-
<property>
-
<name>hive.exec.scratchdir</name>
-
<value>/hive/scratchdir</value>
-
<description>ScratchspaceforHivejobs</description>
-
</property>
-
-
<property>
-
<name>hive.exec.local.scratchdir</name>
-
<value>/tmp/${user.name}</value>
-
<description>LocalscratchspaceforHivejobs</description>
-
</property>
-
<property>
-
<name>javax.jdo.option.ConnectionURL</name>
-
<value>jdbc:derby:;databaseName=metastore_db;create=true</value>
-
<description>JDBCconnectstringforaJDBCmetastore</description>
-
</property>
-
-
<property>
-
<name>javax.jdo.option.ConnectionDriverName</name>
-
<value>org.apache.derby.jdbc.EmbeddedDriver</value>
-
<description>DriverclassnameforaJDBCmetastore</description>
-
</property>
-
-
<property>
-
<name>javax.jdo.PersistenceManagerFactoryClass</name>
-
<value>org.datanucleus.api.jdo.JDOPersistenceManagerFactory</value>
-
<description>classimplementingthejdopersistence</description>
-
</property>
-
-
<property>
-
<name>javax.jdo.option.DetachAllOnCommit</name>
-
<value>true</value>
-
<description>detachesallobjectsfromsessionsothattheycanbeusedaftertransactioniscommitted</description>
-
</property>
-
-
<property>
-
<name>javax.jdo.option.ConnectionUserName</name>
-
<value>APP</value>
-
<description>usernametouseagainstmetastoredatabase</description>
-
</property>
-
-
<property>
-
<name>javax.jdo.option.ConnectionPassword</name>
-
<value>mine</value>
-
<description>passwordtouseagainstmetastoredatabase</description>
-
</property>
-
-
<property>
-
<name>hive.metastore.warehouse.dir</name>
-
<value>/hive/warehousedir</value>
-
<description>locationofdefaultdatabaseforthewarehouse</description>
-
</property>
-
-
-
<property>
-
<name>hive.aux.jars.path</name>
-
<value>
-
file:///home/hadoop/hive-0.12.0/lib/hive-ant-0.13.0-SNAPSHOT.jar,
-
file:///home/hadoop/hive-0.12.0/lib/protobuf-java-2.4.1.jar,
-
file:///home/hadoop/hive-0.12.0/lib/hbase-client-0.96.0-hadoop2.jar,
-
file:///home/hadoop/hive-0.12.0/lib/hbase-common-0.96.0-hadoop2.jar,
-
file:///home/hadoop/hive-0.12.0/lib/zookeeper-3.4.5.jar,
-
file:///home/hadoop/hive-0.12.0/lib/guava-11.0.2.jar
-
</value>
-
</property>
Hive使用Hadoop,这意味着你必须在PATH里面设置了hadoop路径,或者导出export HADOOP_HOME=<hadoop-install-dir>也可以。
另外,你必须在创建Hive库表前,在HDFS上创建/tmp和/hive/warehousedir(也称为hive.metastore.warehouse.dir的),并且将它们的权限设置为chmod g+w。完成这个操作的命令如下:
$ $HADOOP_HOME/bin/hadoop fs -mkdir /tmp
$ $HADOOP_HOME/bin/hadoop fs -mkdir /hive/warehousedir
$ $HADOOP_HOME/bin/hadoop fs -chmod g+w /tmp
$ $HADOOP_HOME/bin/hadoop fs -chmod g+w/hive/warehousedir
我同样发现设置HIVE_HOME是很重要的,但并非必须。
$ export HIVE_HOME=<hive-install-dir>
在Shell中使用Hive命令行(cli)模式:
$ $HIVE_HOME/bin/hive
5. 启动hive
1).单节点启动
#bin/hive -hiveconf hbase.master=master:490001
2) 集群启动:
#bin/hive -hiveconf hbase.zookeeper.quorum=node1,node2,node3
如何hive-site.xml文件中没有配置hive.aux.jars.path,则可以按照如下方式启动。
bin/hive --auxpath /usr/local/hive/lib/hive-hbase-handler-0.96.0.jar, /usr/local/hive/lib/hbase-0.96.jar,
 /usr/local/hive/lib/zookeeper-3.3.2.jar -hiveconf hbase.zookeeper.quorum=node1,node2,node3
启动直接#bin/hive 也可以。
6 测试hive
建立测试表pokes
hive>CREATE TABLE pokes (foo INT, bar STRING);
OK
Time taken: 1.842 seconds
hive> show tables;
OK
pokes
Time taken: 0.182 seconds, Fetched: 1 row(s)
数据导入pokes
hive> LOAD DATA LOCAL INPATH './examples/files/kv1.txt' OVERWRITE INTO pokse
然后查看hadoop的文件:
bin/hadoop dfs -ls /hive/warehousedir
看到新增一个文件:
drwxr-xr-x - hadoop supergroup 0 09:06 /hive/warehousedir/pokes
注:使用derby存储方式时,运行hive会在当前目录生成一个derby文件和一个metastore_db目录。这种存储方式的弊端是在同一个目录下同时只能有一个hive客户端能使用数据库,否则报错。
4. 使用MYSQL数据库的方式安装
安装MySQL
Ubuntu 采用apt-get安装
sudo apt-get install mysql-server
建立数据库hive
createdatabasehivemeta
创建hive用户,并授权
grantallonhive.*tohive@'%'identifiedby'hive';
flushprivileges;
我们直接修改hive-site.xml就可以啦。
修改hive-site.xml
<xml version="1.0">
<xml-stylesheet type="text/xsl" href="configuration.xsl">
<configuration>
<property>
<name>hive.exec.scratchdir</name>
<value>/hive/scratchdir</value>
<description>Scratch space for Hive jobs</description>
</property>
<property>
<name>hive.exec.local.scratchdir</name>
<value>/tmp/${user.name}</value>
<description>Local scratch space for Hive jobs</description>
</property>
<property>
<name>javax.jdo.option.ConnectionURL</name>
<value>jdbc:mysql://192.168.1.214:3306/hiveMetacreateDatabaseIfNotExist=true</value>
<description>JDBC connect string for a JDBC metastore</description>
</property>
<property>
<name>javax.jdo.option.ConnectionDriverName</name>
<value>com.mysql.jdbc.Driver</value>
<description>Driver class name for a JDBC metastore</description>
</property>
<property>
<name>javax.jdo.option.ConnectionUserName</name>
<value>hive</value>
<description>username to use against metastore database</description>
</property>
<property>
<name>javax.jdo.option.ConnectionPassword</name>
<value>hive</value>
<description>password to use against metastore database</description>
</property>
<property>
<name>hive.metastore.warehouse.dir</name>
<value>/hive/warehousedir</value>
<description>location of default database for the warehouse</description>
</property>
<property>
<name>hive.aux.jars.path</name>
<value>
file:///home/hadoop/hive-0.12.0/lib/hive-ant-0.13.0-SNAPSHOT.jar,
file:///home/hadoop/hive-0.12.0/lib/protobuf-java-2.4.1.jar,
file:///home/hadoop/hive-0.12.0/lib/hbase-client-0.96.0-hadoop2.jar,
file:///home/hadoop/hive-0.12.0/lib/hbase-common-0.96.0-hadoop2.jar,
file:///home/hadoop/hive-0.12.0/lib/zookeeper-3.4.5.jar,
file:///home/hadoop/hive-0.12.0/lib/guava-11.0.2.jar
</value>
</property>
jdbc:mysql://192.168.1.214:3306/hiveMetacreateDatabaseIfNotExist=true
其中hiveMeta是mysql的数据库名。createDatabaseIfNotExist没有就自动创建
本地mysql启动hive :
直接运行#bin/hive 就可以。
远端mysql方式,启动hive:
服务器端(192.168.1.214上机master上):
在服务器端启动一个 MetaStoreServer,客户端利用 Thrift
协议通过 MetaStoreServer 访问元数据库。
启动hive,这个又可以分为启动metastore和hiveserver,其中metastore用于和mysql之间的表结构创建或更新时通讯,hiveserver用于客户端连接,这这个都要启动,具体的启动命令:
启动metastore:hive --service metastore -hiveconf
hbase.zookeeper.quorum=node1,node2,node3-hiveconf hbase.zookeeper.property.clientPort=2222(远程mysql需要启动)
启动hiveservice:hive --service hiveserver-hiveconf
hbase.zookeeper.quorum=node1,node2,node3-hiveconf
hbase.zookeeper.property.clientPort=2222(启动服务,这样jdbc:hive就能连上,默认10000端口,后面的部分一定要带上,否则用eclipse连接不上的)
起来后我们在eclipse就可以使用jdbc:hive来连接了。如
Class.forName("org.apache.hadoop.hive.jdbc.HiveDriver");
Connectionconn=DriverManager.getConnection("jdbc:hive://server1:10000/hiveMeta","root","111111");
returnconn;
其实使用上和普通的数据库已经很相似了,除了建表的语句有一些差别。
当然你也可以在hive-0.12.0/bin运行
hive -hiveconf hive.root.logger=DEBUG,console-hiveconf
hbase.zookeeper.quorum=server2,server3-hiveconf hbase.zookeeper.property.clientPort=2222
其中 hbase.zookeeper.property.clientPort就是hbase-site.xml配置的zookeeper的端口号。
客户端hive 的hive-site.xml配置文件:
-
<xmlversion="1.0">
-
<xml-stylesheettype="text/xsl"href="configuration.xsl">
-
-
<configuration>
-
-
<property>
-
<name>hive.metastore.warehouse.dir</name>
-
<value>/hive/warehousedir</value>
-
</property>
-
-
<property>
-
<name>hive.metastore.local</name>
-
<value>false</value>
-
</property>
-
-
<property>
-
<name>hive.metastore.uris</name>
-
<value>thrift://192.168.1.214:9083</value>
-
</property>
-
-
</configuration>
这一步,我们新加了配置
<property>
<name>hive.metastore.uris</name>
<value>thrift://192.168.1.214:9083</value>
</property>
这个就是使用thrift访问的端口配置。thrift://192.168.1.214:9083就是hive元数据访问路径。
进入hive客户端,运行show tables;
至此,可以在linux用各种shell来测试,也可以通过eclipse连接到hive来测试,和通过jdbc连接普通数据库一致
hive的服务端和客户端都可以放在同一台服务器上:
hive-site.xml
-
<xmlversion="1.0">
-
<xml-stylesheettype="text/xsl"href="configuration.xsl">
-
<configuration>
-
-
-
<property>
-
<name>hive.exec.scratchdir</name>
-
<value>/hive/scratchdir</value>
-
<description>ScratchspaceforHivejobs</description>
-
</property>
-
-
-
<property>
-
<name>hive.exec.local.scratchdir</name>
-
<value>/tmp/${user.name}</value>
-
<description>LocalscratchspaceforHivejobs</description>
-
</property>
-
<property>
-
<name>javax.jdo.option.ConnectionURL</name>
-
<value>jdbc:mysql://192.168.1.214:3306/hiveMetacreateDatabaseIfNotExist=true</value>
-
<description>JDBCconnectstringforaJDBCmetastore</description>
-
</property>
-
-
-
<property>
-
<name>javax.jdo.option.ConnectionDriverName</name>
-
<value>com.mysql.jdbc.Driver</value>
-
<description>DriverclassnameforaJDBCmetastore</description>
-
</property>
-
-
-
<property>
-
<name>javax.jdo.option.ConnectionUserName</name>
-
<value>hive</value>
-
<description>usernametouseagainstmetastoredatabase</description>
-
</property>
-
-
-
<property>
-
<name>javax.jdo.option.ConnectionPassword</name>
-
<value>hive</value>
-
<description>passwordtouseagainstmetastoredatabase</description>
-
</property>
-
-
-
<property>
-
<name>hive.metastore.warehouse.dir</name>
-
<value>/hive/warehousedir</value>
-
<description>locationofdefaultdatabaseforthewarehouse</description>
-
</property>
-
-
<property>
-
<name>hive.aux.jars.path</name>
-
<value>
-
file:///home/hadoop/hive-0.12.0/lib/hive-ant-0.13.0-SNAPSHOT.jar,
-
file:///home/hadoop/hive-0.12.0/lib/protobuf-java-2.4.1.jar,
-
file:///home/hadoop/hive-0.12.0/lib/hbase-client-0.96.0-hadoop2.jar,
-
file:///home/hadoop/hive-0.12.0/lib/hbase-common-0.96.0-hadoop2.jar,
-
file:///home/hadoop/hive-0.12.0/lib/zookeeper-3.4.5.jar,
-
file:///home/hadoop/hive-0.12.0/lib/guava-11.0.2.jar
-
</value>
-
-
<property>
-
<name>hive.metastore.uris</name>
-
<value>thrift://192.168.1.214:9083</value>
-
</property>
-
</property>
4. 与Hbase整合
之前我们测试创建表的都是创建本地表,非hbase对应表。现在我们整合回到hbase。
1.创建hbase识别的数据库:
-
CREATETABLEhbase_table_1(keyint,valuestring)
-
STOREDBY'org.apache.hadoop.hive.hbase.HBaseStorageHandler'
-
WITHSERDEPROPERTIES("hbase.columns.mapping"=":key,cf1:val")
-
TBLPROPERTIES("hbase.table.name"="xyz");
hbase.table.name 定义在hbase的table名称
hbase.columns.mapping 定义在hbase的列族
在hbase 下也能看到,两边新增数据都能实时看到。
可以登录Hbase去查看数据了
#bin/hbase shell
hbase(main):001:0> describe 'xyz'
hbase(main):002:0> scan 'xyz'
hbase(main):003:0> put 'xyz','100','cf1:val','www.360buy.com'
这时在Hive中可以看到刚才在Hbase中插入的数据了。
2.使用sql导入数据
如果要insert 与hbase整合的表,不能像本地表一样load,需要利用已有的表进行。如
insert
overwritehbase_table_1hivetest select * frompokes
注意两个的类型要一致,否则用insert
overwrite table hivetest select * from table_hive; 导不进去数据
使用sql导入hbase_table_1:
hive> INSERT OVERWRITE TABLE hbase_table_1 SELECT * FROM pokes WHERE foo=86;
3 hive访问已经存在的hbase
使用CREATE EXTERNAL TABLE:
-
CREATEEXTERNALTABLEhbase_table_2(keyint,valuestring)
-
STOREDBY'org.apache.hadoop.hive.hbase.HBaseStorageHandler'
-
WITHSERDEPROPERTIES("hbase.columns.mapping"="cf1:val")
-
TBLPROPERTIES("hbase.table.name"="some_existing_table");
内容参考:http://wiki.apache.org/hadoop/Hive/HBaseIntegration
5. 问题
bin/hive 执行show tables 报错:
Unable to instantiate org.apache.hadoop.hive.metastore.HiveMetaStoreClient
如果是使用Derby数据库的安装方式,查看
<property>
<name>hive.metastore.warehouse.dir</name>
<value>/hive/warehousedir</value>
<description>location of default database for the warehouse</description>
</property>
配置是否正确,
或者
<property>
<name>javax.jdo.option.ConnectionURL</name>
<value>jdbc:derby:;databaseName=metastore_db;create=true</value>
<description>JDBC connect string for a JDBC metastore</description>
</property>
是否有权限访问。
如果配置了mysql的Metastore方式,检查的权限:
bin/hive -hiveconfhive.root.logger=DEBUG,console
然后show tables 就会看到ava.sql.SQLException: Access denied for user 'hive'@'××××8' (using password: YES) 之类从错误消息。
执行
CREATE TABLE hbase_table_1(key int, value string)
STORED BY 'org.apache.hadoop.hive.hbase.HBaseStorageHandler'
WITH SERDEPROPERTIES ("hbase.columns.mapping" = ":key,cf1:val")
TBLPROPERTIES ("hbase.table.name" = "xyz");
报错:
FAILED: Execution Error, return code 1 from org.apache.hadoop.hive.ql.exec.DDLTask. MetaException(message:org.apache.hadoop.hbase.MasterNotRunningException: Retried 10 times
出现这个错误的原因是引入的hbase包和hive自带的hive包冲突,删除hive/lib下的hbase-0.94.×××.jar, OK了。
同时也要移走hive-0.12**.jar 包。
执行
hive>select uid from user limit 100;
java.io.IOException: Cannot initialize Cluster. Please check your configuration for mapreduce.framework.name and the correspond server addresses.
解决:修改$HIVE_HOME/conf/hive-env.sh文件,加入
export HADOOP_HOME=hadoop的安装目录
5. 通过thrift访问hive(使用php做客户端)
php连接hive执行sql查询
使用php连接hive的条件:
1. 下载thrift
wget http://mirror.bjtu.edu.cn/apache//thrift/0.9.1/thrift-0.9.1.tar.gz
2. 解压
tar -xzf thrift-0.9.1.tar.gz
3 .编译安装:
如果是源码编译的,首先要使用./boostrap.sh创建文件./configure ,我们这下载的tar包,自带有configure文件了。((可以查阅README文件))
If you are building from the first time out of the source repository, you will
need to generate the configure scripts. (This is not necessary if you
downloaded a tarball.) From the top directory, do:
./bootstrap.sh
./configure
1 需要安装thrift 安装步骤
# ./configure --without-ruby
不要使用ruby,
make ; make install
如果没有安装libevent libevent-devel的应该先安装这两个依赖库yum -y install libevent libevent-devel
其实Thrift就是使用来生成客户端和服务器端代码的。在这里没用到。
安装好后启动hive thrift
# ./hive--service hiveserver >/dev/null 2>/dev/null &
查看hiveserver默认端口是否打开10000 如果打开表示成功,在官网wiki有介绍文章:https://cwiki.apache.org/confluence/display/Hive/HiveServer
Thrift Hive Server
HiveServer is an optional service that allows a remoteclientto submit requests to Hive, using a variety
of programming languages, and retrieve results. HiveServer is built on Apache ThriftTM(http://thrift.apache.org/),
therefore it is sometimes called theThrift serveralthough this can lead to confusion because a newer service namedHiveServer2is
also built on Thrift.
Thrift'sinterface definition language (IDL) file for HiveServer ishive_service.thrift, which is installed in$HIVE_HOME/service/if/.
Once Hive has been built using steps inGetting Started, the Thrift server can be started by running
the following:
$
build/dist/bin/hive--service
hiveserver --help
usage:
 hiveserver
-h,--help
 Print help information
--hiveconf
<property=value> Use valueforgiven
property
--maxWorkerThreads
 <arg> maximum number of worker threads,
default:2147483647
--minWorkerThreads
 <arg> minimum number of worker threads,
default:100
-p
 <port> Hive Server port number, default:10000
-v,--verbose
Verbose mode
$
bin/hive--service
hiveserver
|
下载php客户端包:
其实hive-0.12包中自带的php lib,经测试,该包报php语法错误。命名空间的名称竟然是空的。
我上传php客户端包:http://download.csdn.net/detail/hguisu/6913673(源下载http://download.csdn.net/detail/jiedushi/3409880)
php连接hive客户端代码
-
<php
-
-
ini_set('display_errors',1);
-
error_reporting(E_ALL);
-
$GLOBALS['THRIFT_ROOT']=dirname(__FILE__)."/";
-
-
require_once$GLOBALS['THRIFT_ROOT'].'packages/hive_service/ThriftHive.php';
-
require_once$GLOBALS['THRIFT_ROOT'].'transport/TSocket.php';
-
require_once$GLOBALS['THRIFT_ROOT'].'protocol/TBinaryProtocol.php';
-
-
$transport=newTSocket('192.168.1.214',10000);
-
$protocol=newTBinaryProtocol($transport);
-
-
-
-
$client=newThriftHiveClient($protocol);
-
$transport->open();
-
-
-
-
$client->execute('showtables');
-
var_dump($client->fetchAll());
-
$transport->close();
-
-
>
打开浏览器浏览http://localhost/Thrift/test.php就可以看到查询结果了
原文地址:http://blog.csdn.net/hguisu/article/details/7282050