简单而粗暴的方法画任意阶数Bezier曲线
虽然说是任意阶数,但是嘞,算法原理是可以到任意阶数,计算机大概到100多阶就会溢出了
【本文代码】
背景
在windows的OpenGL环境中,使用鼠标在屏幕上选点,并以点为基础画出Bezier曲线
- 初始化
- 鼠标操作
- 3阶以内Bezier曲线
- n阶Bezier曲线
初始化
创建窗口,初始化大小、显示模式、添加显示和鼠标等回调函数,设置背景颜色等。
完成之后,定义两个全局的int类型的vector 用于存储鼠标在窗口中选择的点。同时定义窗口的高度和宽度。
vector<int> x_loc = {};
vector<int> y_loc = {};
int height = 600;
int width = 600;- 定义画点函数
void drawPixel(double x, double y, int point_size)
{
    glViewport(0, 0, (GLsizei)width, (GLsizei)height);
    glEnable(GL_POINT_SMOOTH);
    glEnable(GL_BLEND);
    glBlendFunc(GL_SRC_ALPHA, GL_ONE_MINUS_SRC_ALPHA);
    glPointSize(point_size);
    glBegin(GL_POINTS);
    glVertex2d(x, y);
    glEnd();
}其中point_size为点的大小。
鼠标操作
OpenGL中存在鼠标点击、拖动等操作的回调函数,使用十分方便,调用即可。
我们定义在鼠标左键按下抬起后为一次屏幕选点,并将所选的点的坐标压入存储存储点的坐标的容器中。
void Mouse_hit(int button, int state, int x, int y)
{
    /// state == 1 mean button up
    /// state == 0 mean button down
    /// button == 0 mean left button
    /// button == 1 mean middle button
    /// button == 2 mean right button
    /// [x, y] is the location of mouse pointer
    if (button == 0 && state == 1)
    {
        x_loc.push_back(x);
        y_loc.push_back(y);
        cout << "point location: " << x_loc[x_loc.size() - 1] << " " << y_loc[y_loc.size() - 1] << endl;
    }
}
回调函数使用为
glutMouseFunc(Mouse_hit);Mouse_hit函数中state代表当前鼠标的状态是按下还是抬起button为按下的是左、中、右三键中的哪一个
[x, y]为当前鼠标指针的坐标。次坐标不是世界坐标系,使用时得进行转换,看后面
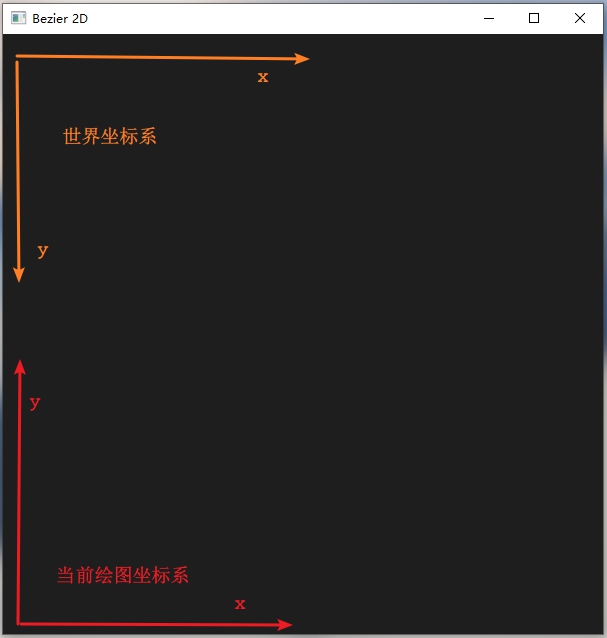
坐标转换
拿一张图简单说明一下。由于鼠标获取的是世界坐标系下的位置,而在屏幕上绘制点与线是使用的是当前绘图坐标系,所以要进行简单的坐标变换。
可在显示回调函数中使用如下代码重设OpenGL窗口。
    glViewport(0, 0, (GLsizei)width, (GLsizei)height);
    glMatrixMode(GL_PROJECTION);
    glLoadIdentity();
    gluOrtho2D(0, width, height, 0);
好了,设置一下前景色和点的大小形状等,来看看画点的效果。

3阶以内的Bezier曲线
对于3阶以内的Bezier曲线,直接将Bezier曲线的定义公式展开,求解系数即可。
void drawBezier_1(vector<int> x, vector<int> y, int num_of_points)
{
    float ax, bx;
    float ay, by;
    int temp_loc = x.size() - 2;

    glColor3f(0.0f, 0.0f, 1.0f);
    drawPixel(x[temp_loc + 0], y[temp_loc + 0], 7);
    drawPixel(x[temp_loc + 1], y[temp_loc + 1], 7);
    ax = x[temp_loc + 0];
    ay = y[temp_loc + 0];
    bx = x[temp_loc + 1];
    by = y[temp_loc + 1];

    float t;
    t = 0.0;
    float dt = 0.002;
    while (t <= 1)
    {
        float x_temp = (1 - t) * ax + t * bx;
        float y_temp = (1 - t) * ay + t * by;
        drawPixel(x_temp, y_temp, 1);
        t += dt;
    }
}

void drawBezier_2(vector<int> x, vector<int> y, int num_of_points)
{
    float ax, bx;
    float ay, by;
    float tSquared;
    int temp_loc = x.size() - 3;

    ax = x[temp_loc + 0] - 2 * x[temp_loc + 1] + x[temp_loc + 2];
    ay = y[temp_loc + 0] - 2 * y[temp_loc + 1] + y[temp_loc + 2];
    bx = x[temp_loc + 0] * (-2) + x[temp_loc + 1] * 2;
    by = y[temp_loc + 0] * (-2) + y[temp_loc + 1] * 2;

    glColor3f(0.0f, 0.0f, 1.0f);
    drawPixel(x[temp_loc + 0], y[temp_loc + 0], 7);
    drawPixel(x[temp_loc + 1], y[temp_loc + 1], 7);
    drawPixel(x[temp_loc + 2], y[temp_loc + 2], 7);

    float t;
    t = 0.0;
    float dt = 0.002;
    while (t <= 1)
    {
        tSquared = t * t;
        float x_temp = ax * tSquared + bx * t + x[temp_loc + 0];
        float y_temp = ay * tSquared + by * t + y[temp_loc + 0];
        drawPixel(x_temp, y_temp, 1);
        t += dt;
    }
}

void drawBezier_3(vector<int> x, vector<int> y, int num_of_points)
{
    float ax, bx, cx;
    float ay, by, cy;
    float tSquared, tCubed;
    int temp_loc = x.size() - 4;

    cx = 3.0 * (x[temp_loc + 1] - x[temp_loc + 0]);
    bx = 3.0 * (x[temp_loc + 2] - x[temp_loc + 1]) - cx;
    ax = x[temp_loc + 3] - x[temp_loc + 0] - cx - bx;

    cy = 3.0 * (y[temp_loc + 1] - y[t