本文将深入探讨 AM 向 RM 申请并获得 Container 资源后,在 NM 节点上如何启动和清理 Container。将详细分析整个过程的源码实现。
一、Container 生命周期介绍
Container 的启动由 ApplicationMaster 通过调用 RPC 函数 ContainerManagementProtocol#startContainers() 发起请求,NM 中的 ContainerManagerImpl 组件负责接收并处理该函数发来的请求。
Container 启动过程主要分为四个阶段:通知 NM 启动 Container、资源本地化、启动并运行 Container、资源清理。
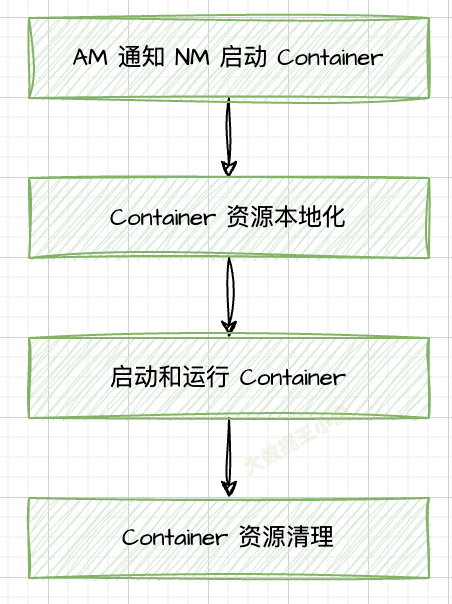
资源本地化:
主要是指分布式缓存机制完成的工作(详见上一篇《6-3 NodeManager 分布式缓存》)。
功能包括初始化各种服务组件、创建工作目录、从 HDFS 下载运行所需的各种资源(比如文本文件、JAR 包、可执行文件)等。
Container 启动:
由 ContainerLauncher 服务完成,该服务将进一步调用插拔式组件 ContainerExecutor。Yarn 中提供了三种 ContainerExecutor 实现,分别为 DefaultContainerExecutor、LinuxContainerExecutor、DockerContainerExecutor。
资源清理:
是资源本地化的逆过程,它负责清理各类资源,均由 ResourceLocalizationService 服务完成。
二、Container 生命周期源码分析
一)AM 通知 NM 启动 Container
主要流程如下:
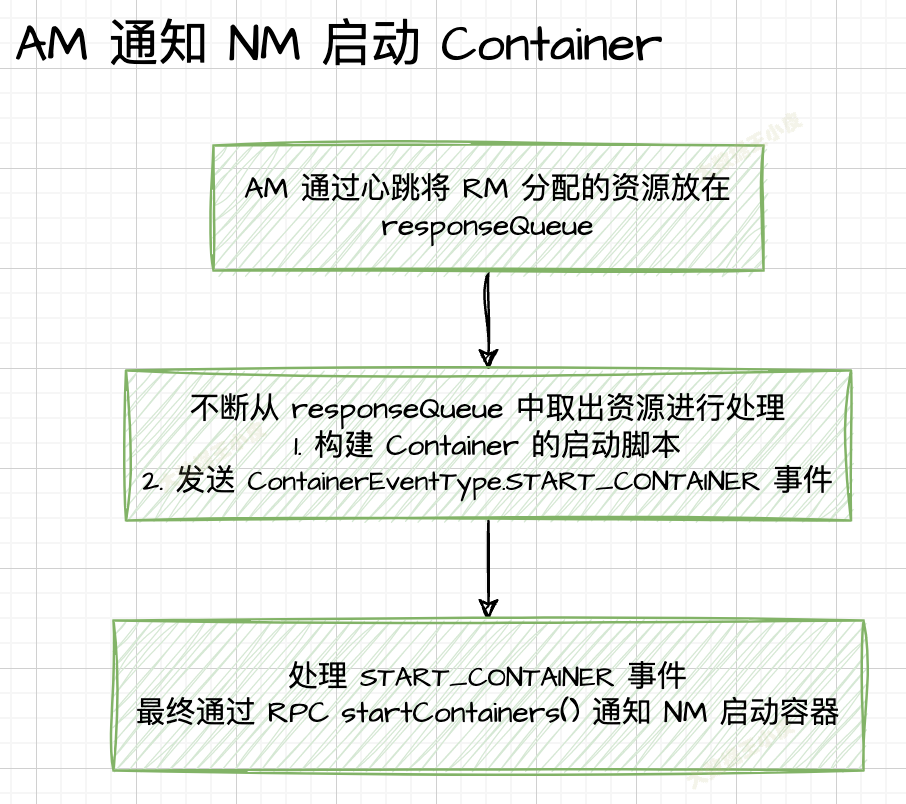
AM AMRMClientAsyncImpl 通过 RPC 函数 ApplicationMaster#allocate() 周期性向 RM 申请资源,并将申请到的资源保存在阻塞队列 responseQueue 中。
(下面仅截取重要逻辑的源码)
  private class HeartbeatThread extends Thread {
    public void run() {
      while (true) {
        AllocateResponse response = null;

          try {
            // 发心跳。发给 RM 当前的进度,从 RM 领取分配的 Container 及其他信息。
            response = client.allocate(progress);
          }

          // 将 RM 通过心跳返回的信息放到阻塞队列 responseQueue 中,等待处理
          responseQueue.put(response);
跟踪 responseQueue,其在 CallbackHandlerThread 进行取出,处理分配到的 Container。
  private class CallbackHandlerThread extends Thread {
    public void run() {
      while (true) {
        try {
          AllocateResponse response;
          try {
            // 从 responseQueue 取出资源,对应心跳线程中 responseQueue.put(response)
            response = responseQueue.take();
          }

          // 重点:处理分配到的 Container
          List<Container> allocated = response.getAllocatedContainers();
          if (!allocated.isEmpty()) {
            // 到 ApplicationMaster#onContainersAllocated() 处理
            handler.onContainersAllocated(allocated);
          }
ApplicationMaster#onContainersAllocated() 会对分配出来的 Container 资源进行处理。
    public void onContainersAllocated(List<Container> allocatedContainers) {
      for (Container allocatedContainer : allocatedContainers) {
        // 创建运行 Container 的 LaunchContainerRunnable 线程
        Thread launchThread = createLaunchContainerThread(allocatedContainer,
            yarnShellId);

        // launch and start the container on a separate thread to keep
        // the main thread unblocked
        // as all containers may not be allocated at one go.
        launchThreads.add(launchThread);
        launchedContainers.add(allocatedContainer.getId());
        // 启动 LaunchContainerRunnable 线程
        launchThread.start();
      }
    }
launchThread 是内部类 LaunchContainerRunnable 的实例,关注其 run() 方法干了啥,主要两件事:
- 构建 Container 的启动脚本
- 调用
NMClientAsync#startContainerAsync()api 接口发送ContainerEventType.START_CONTAINER事件
	  // 1. 构建 Container 的启动脚本(省略了构建的细节)
	  ContainerLaunchContext ctx = ContainerLaunchContext.newInstance(
        localResources, myShellEnv, commands, null, allTokens.duplicate(),
          null);
      containerListener.addContainer(container.getId(), container);
	  // 2. 重点:通过 NMClientAsync api 发送 ContainerEventType.START_CONTAINER 事件
      nmClientAsync.startContainerAsync(container, ctx);
后续就是处理这个事件,并调用 NM RPC 函数启动 container 的过程,具体如下:
- 放到
BlockingQueue<ContainerEvent> events中 NMClientAsyncImpl的eventDispatcherThread会不断处理events中的事件START_CONTAINER事件对应的状态机处理类是StartContainerTransition- 其中执行
container.nmClientAsync.getClient().startContainer() - 这里调用 NM RPC
**ContainerManagementProtocol#startContainers()**通知 NM 启动 Container。
// yarn/client/api/impl/NMClientImpl.java
  public Map<String, ByteBuffer&