注: 该章节主要为原创内容,为后续的Spring MVC内容做一个先行铺垫
1.Servlet的构建使用
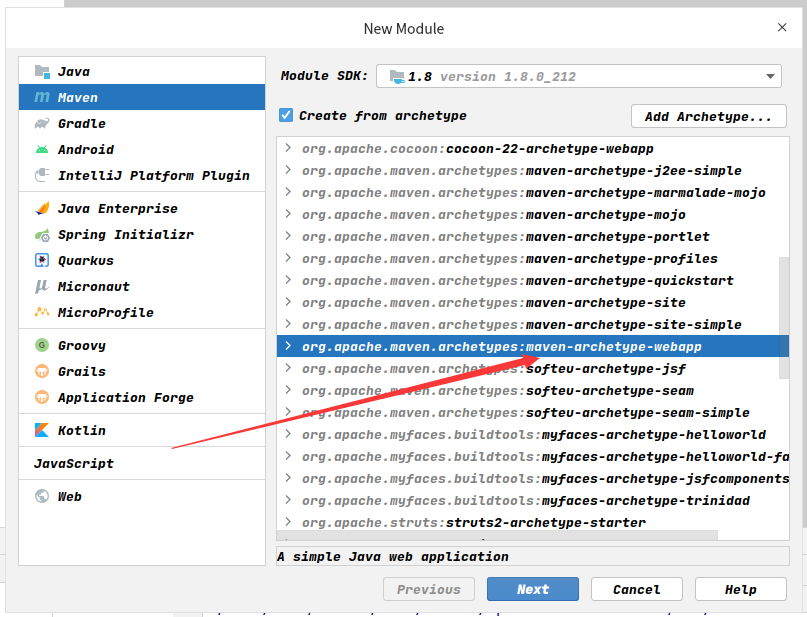
(1) 选择Maven -> webapp来构建一个web应用
(2) 构建好后,打开pom.xml文件,一要注意打包方式为war包,二导入servlet依赖,如下
<!-- 打war包 -->
<packaging>war</packaging>

<!-- 导入servlet依赖 -->
<dependencies>
  <dependency>
    <groupId>javax.servlet</groupId>
    <artifactId>javax.servlet-api</artifactId>
    <version>3.1.0</version>
    <scope>provided</scope>
  </dependency>
</dependencies>
(3) 替换webapp/WEB-INF/web.xml文件为如下内容,采用Servlet 3.1版本
<?xml version="1.0" encoding="UTF-8"?>
<web-app xmlns="http://xmlns.jcp.org/xml/ns/javaee"
         xmlns:xsi="http://www.w3.org/2001/XMLSchema-instance"
         xsi:schemaLocation="http://xmlns.jcp.org/xml/ns/javaee
                             http://xmlns.jcp.org/xml/ns/javaee/web-app_3_1.xsd"
         version="3.1">

</web-app>
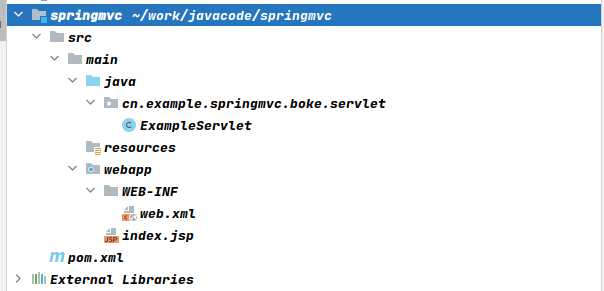
(4) 在main目录下,新建java目录和resources目录,并在java目录下新建包,最终项目目录结构如下
(5) 编写一个简单的servlet如下
@WebServlet("/example")
public class ExampleServlet extends HttpServlet {

    @Override
    protected void doGet(HttpServletRequest req, HttpServletResponse resp) throws ServletException, IOException {
        resp.getWriter().write("example...");
    }
}
(6) 有了servlet后,我们得让服务器知道哪个请求要交给哪个servlet处理,因此还需要配置web.xml如下
<!-- web.xml中 -->
<web-app ...>
    <!-- 配置servlet,给指定的servlet取一个名字 -->
    <servlet>
        <servlet-name>exampleServlet</servlet-name>
        <servlet-class>cn.example.springmvc.boke.servlet.ExampleServlet</servlet-class>
    </servlet>

    <!-- 配置哪个请求交由哪个servlet来进行处理,这里为了方便使用 / ,即拦截所有的请求都交由exampleServlet来处理 -->
    <servlet-mapping>
        <servlet-name>exampleServlet</servlet-name>
        <url-pattern>/</url-pattern>
    </servlet-mapping>
</web-app>
(7) 然后,为了能够在网页上访问,我们得把这个项目部署到tomcat服务器中
首先,在URL栏中,添加上项目名称,此处为springmvc

然后,在Deployment中添加我们的项目
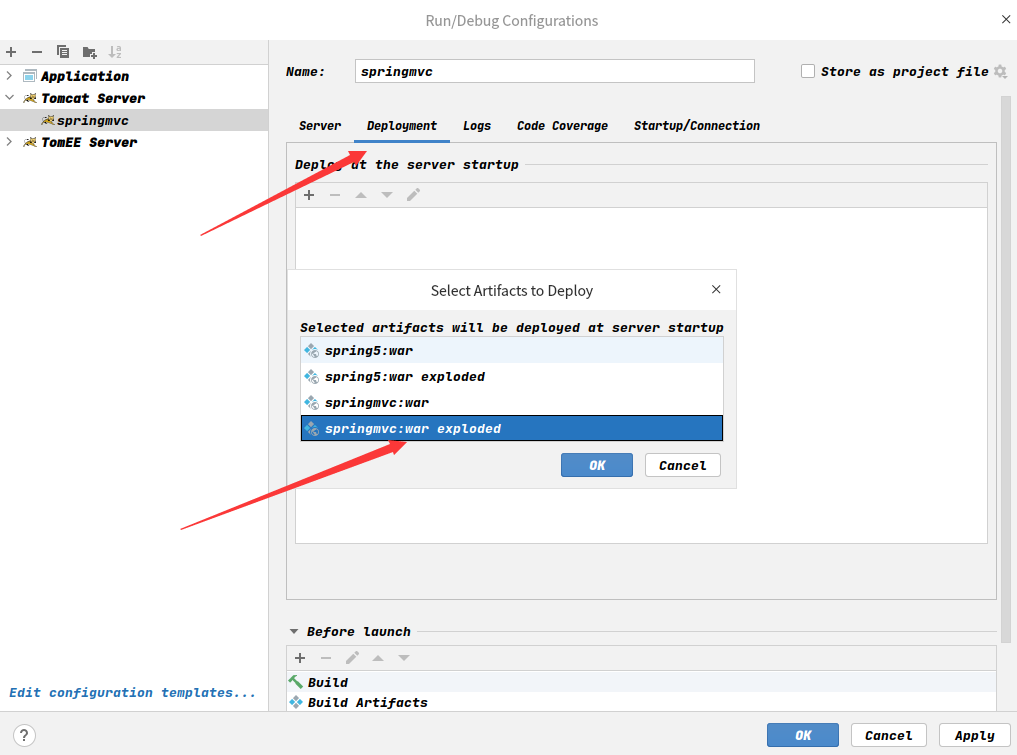
最后,注意 Application Context 中的值,应与前面在URL栏中添加的项目名称相同,此处均为springmvc

(8) 最后,启动tomcat服务器,在浏览器上输入 http://localhost:8080/springmvc/example ,如果能看到 example... 字符串,则说明项目配置成功
2.基于web.xml,整合Spring与Servlet
(1) 现在,web应用已经搭建好了,但是我们希望能够在该应用中使用Spring容器,该怎么办呢? 在之前的非web环境中,我们都是在main方法中创建ioc容器(如 new ClassPathXmlApplicationContext()),然后直接使用的,但是现在没有了main方法,该由谁来创建ioc容器呢? 答案就是由我们的web容器,可以在web应用初始化的时候来帮助我们创建,但创建好之后,我们该怎么获取到ioc容器呢? Servlet规定了4大作用域,分别为page域(PageContext),当前页面有效; request域(HttpServletContext),一次请求内有效; session域(HttpSession),一次会话内有效; application域(ServletContext),在当前整个web应用内有效,因此我们可以将创建好的ioc容器直接放到application域中,这样在任何位置,我们都能拿到ioc容器进行使用,具体示例如下
首先导入相关的Spring依赖包
<dependencies>
  <dependency>
    <groupId>org.springframework</groupId>
    <artifactId>spring-context</artifactId>
    <version>5.2.22.RELEASE</version>
  </dependency>

  <dependency>
    <groupId>org.springframework</groupId>
    <artifactId>spring-web</artifactId>
    <version>5.2.22.RELEASE</version>
  </dependency>
</dependencies>
接着,修改我们的代码,配置一个普通的bean
//创建一个普通的java类
public class ExampleService {
    public String get() {
        return &q