实现Spring底层机制-02
3.实现任务阶段1
3.1知识拓展-类加载器
- Java的类加载器有三种:
- Bootstrap类加载器 ----- 对应路径 jre/lib
- Ext类加载器 ----- 对应路径 jre/lib/ext
- App类加载器 ----- 对应路径 classpath
- classpath 类路径,就是java.exe执行时,指定的路径。
3.2分析
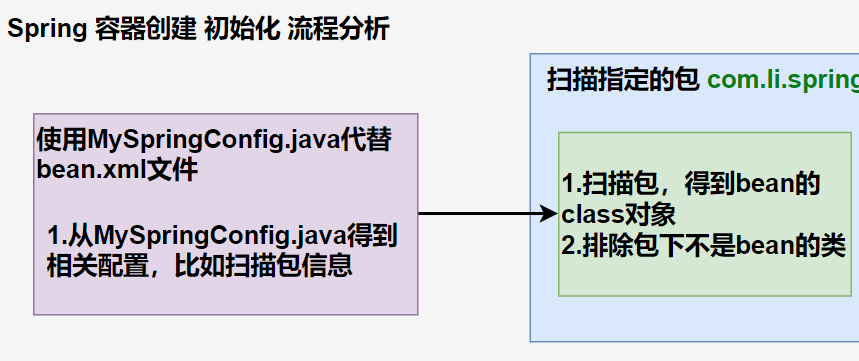
阶段1目标:编写自己的spring容器,实现扫描包,得到bean的class对象
3.3代码实现
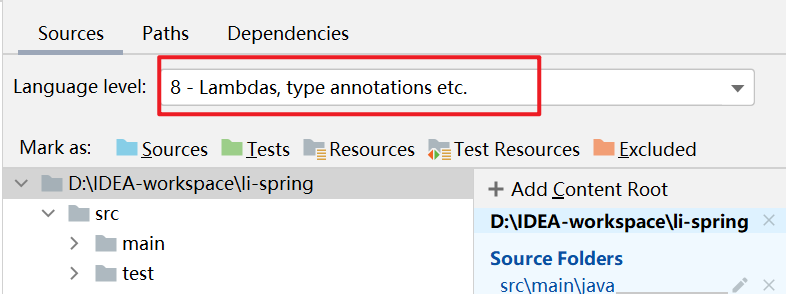
1.创建新的maven项目,注意把项目的 language level 改为支持 java8
在pom.xml文件中指定编译版本:
<properties>
    <maven.compiler.source>8</maven.compiler.source>
    <maven.compiler.target>8</maven.compiler.target>
</properties>
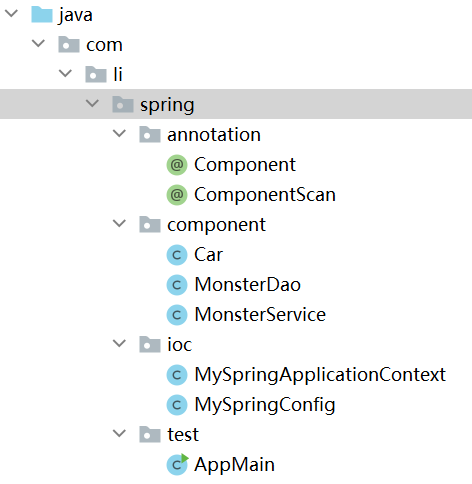
2.创建的架构如下:
3.自定义ComponentScan注解,用于标记要扫描的包
package com.li.spring.annotation;

import java.lang.annotation.ElementType;
import java.lang.annotation.Retention;
import java.lang.annotation.RetentionPolicy;
import java.lang.annotation.Target;

/**
 * @author 李
 * @version 1.0
 * 模仿spring原生注解,自定义一个注解
 * 1. @Target(ElementType.TYPE) 指定ComponentScan注解可以修饰TYPE元素
 * 2. @Retention(RetentionPolicy.RUNTIME) 指定ComponentScan注解 的保留范围
 * 3. String value() default "";  表示 ComponentScan 可以传入一个value值
 */
@Target(ElementType.TYPE)
@Retention(RetentionPolicy.RUNTIME)
public @interface ComponentScan {
    //通过value指定要扫描的包
    String value() default "";
}
4.自定义Component注解,用于标记要扫描的类
package com.li.spring.annotation;

import java.lang.annotation.ElementType;
import java.lang.annotation.Retention;
import java.lang.annotation.RetentionPolicy;
import java.lang.annotation.Target;

@Target(ElementType.TYPE)
@Retention(RetentionPolicy.RUNTIME)
public @interface Component {
    //通过value给要注入的bean指定名字
    String value() default "";
}
5.自定义配置类,相当于原生spring的容器配置文件
package com.li.spring.ioc;

import com.li.spring.annotation.ComponentScan;

/**
 * @author 李
 * @version 1.0
 * 这是一个配置类,作用类似我们原生 spring 的容器配置文件 beans.xml
 */
@ComponentScan(value = "com.li.spring.component")
public class MySpringConfig {

}
6.自定义spring容器,类似原生ioc容器。(未完成)
目前的功能:
(1)在初始化时,根据传入的配置类.class文件,读取要扫描的包路径
(2)遍历包路径下的文件,找出需要注入的bean
package com.li.spring.ioc;

import com.li.spring.annotation.Component;
import com.li.spring.annotation.ComponentScan;

import java.io.File;
import java.net.URL;

/**
 * @author 李
 * @version 1.0
 * MySpringApplicationContext 类的作用类似Spring原生的ioc容器
 */
public class MySpringApplicationContext {
    private Class configClass;

    //构造器
    public MySpringApplicationContext(Class configClass) {
        this.configClass = configClass;
        //步骤一:获取要扫描的包
        //1.先得到 MySpringConfig配置类的注解 @ComponentScan(value = "com.li.spring.component")
        ComponentScan componentScan =
                (ComponentScan) this.configClass.getDeclaredAnnotation(ComponentScan.class);
        //2.通过 componentScan的 value=>得到要扫描的包路径
        String path = componentScan.value();
        System.out.println("要扫描的包=" + path);

        //步骤二:得到要扫描的包下的所有资源(类.class)
        //1.得到类的加载器-->App 类加载器
        ClassLoader classLoader = MySpringApplicationContext.class.getClassLoader();
        //2.通过类的加载器获取到要扫描的包的资源 url=>类似一个路径
        path = path.replace(".", "/");//将原先路径的.替换成/ ==> com/li/component
        URL resource = classLoader.getResource(path);
        //resource=file:/D:/IDEA-workspace/spring/out/production/spring/com/li/component
        System.out.println("resource=" + resource);
        //3.将要加载的资源(.class)路径下的文件进行遍历
        File file = new File(resource.getFile())