前言
我们在开发中经常会遇到一个小问题。比如下面一个小例子:
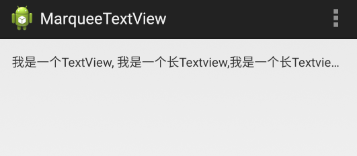
这个文字太长,单行中导致无法全部显示出来,这就是今天要实现的功能。 当然,百度中也有很多这种解决方案。
其中有一种,例如:
    <TextView
        android:layout_width="wrap_content"
        android:layout_height="wrap_content"
        android:singleLine="true"
        android:ellipsize="marquee"
        android:focusable="true"
        android:focusableInTouchMode="true"
        android:text="@string/hello_world" />
android:ellipsize="marquee"
android:focusable="true"
android:focusableInTouchMode="true"
xml中添加这3行 就能实现效果了。
这种方法确实可以实现。
事实上开发过程中,布局是非常复杂和多变的,并不是我们一个TextView就能解决所有的布局和要求。
例如,现在用两个TextView
 1 <RelativeLayout xmlns:android="http://schemas.android.com/apk/res/android"
 2     xmlns:tools="http://schemas.android.com/tools"
 3     android:layout_width="match_parent"
 4     android:layout_height="match_parent"
 5     android:paddingBottom="@dimen/activity_vertical_margin"
 6     android:paddingLeft="@dimen/activity_horizontal_margin"
 7     android:paddingRight="@dimen/activity_horizontal_margin"
 8     android:paddingTop="@dimen/activity_vertical_margin"
 9     tools:context=".MainActivity" >
10
11     <TextView
12         android:id="@+id/textview1"
13         android:layout_width="wrap_content"
14         android:layout_height="wrap_content"
15         android:ellipsize="marquee"
16         android:focusable="true"
17         android:focusableInTouchMode="true"
18         android:singleLine="true"
19         android:text="@string/hello_world" />
20
21     <TextView
22         android:layout_width="wrap_content"
23         android:layout_height="wrap_content"
24         android:layout_below="@id/textview1"
25         android:ellipsize="marquee"
26         android:layout_marginTop="20dp"
27         android:focusable="true"
28         android:focusableInTouchMode="true"
29         android:singleLine="true"
30         android:text="@string/hello_world" />
31
32 </RelativeLayout>
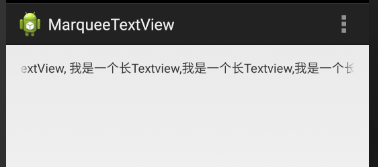
这个简单的功能就满足不了了。

第一个跑马灯效果没问题,第二个就没实现了,平常开发中,两个TextView都解决不了,平常开发中更解决不了了。
这就是今天我所要讲的内容。
首先,我们先建一个类,继承TextView这个类。
 1 package com.example.marqueetextview;
 2
 3 import android.content.Context;
 4 import android.util.AttributeSet;
 5 import android.view.ViewDebug.ExportedProperty;
 6 import android.widget.TextView;
 7
 8 public class MarqueeText extends TextView{
 9
10     public MarqueeText(Context context) {
11         super(context);
12     }
13
14     public MarqueeText(Context context, AttributeSet attrs, int defStyle) {
15         super(context, attrs, defStyle);
16     }
17
18     public MarqueeText(Context context, AttributeSet attrs) {
19         super(context, attrs);
20     }
21     @Override
22     @ExportedProperty(category = "focus")
23     public boolean isFocused() {
24         return true;
25     }
26 }
这个时候实现TextView中的一个方法,isFocused(), 返回改成return true。
然后进Xml中 把TextView修改成我们自定义的这个控件。
 1 <RelativeLayout xmlns:android="http://schemas.android.com/apk/res/android"
 2     xmlns:tools="http://schem