Quartz2D 简介( 后续会有相关应用)
第一部分 绘制直线
代码示例:
- (void)drawRect:(CGRect)rect{
//获取图形上下文
CGContextRef cxContext = UIGraphicsGetCurrentContext();
//开始画图
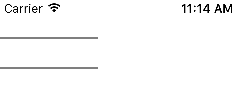
//设置直线起点
CGContextMoveToPoint(cxContext, 0, 20);
//设置直线中点
CGContextAddLineToPoint(cxContext, 100, 20);
//渲染
CGContextStrokePath(cxContext);
}
效果图:

我们只用了四行代码就在view画出了一条直线,但是会觉得很枯燥,知识一条黑色的直线而已。
这样我们给他添点属性。
为了测试我首先只给他添加了颜色
示例代码:
- (void)drawRect:(CGRect)rect{
    //获取图形上下文
    CGContextRef cxContext = UIGraphicsGetCurrentContext();

    //开始画图
    //设置直线起点
    CGContextMoveToPoint(cxContext, 0, 20);
    //设置直线中点
    CGContextAddLineToPoint(cxContext, 100, 20);
    //设置颜色
    CGContextSetRGBStrokeColor(cxContext, 1, 0, 0, 1);
    //渲染
    CGContextStrokePath(cxContext);
}
效果图:

可以看到他变为了红色。
再分析我所添加的代码,可以猜想还有宽度等等。
下面我在添加一下宽度。
示例代码:
- (void)drawRect:(CGRect)rect{
    //获取图形上下文
    CGContextRef cxContext = UIGraphicsGetCurrentContext();

    //开始画图
    //设置直线起点
    CGContextMoveToPoint(cxContext, 0, 20);
    //设置直线中点
    CGContextAddLineToPoint(cxContext, 100, 20);
    //设置颜色
    CGContextSetRGBStrokeColor(cxContext, 1, 0, 0, 1);
    //设置宽度
    CGContextSetLineWidth(cxContext, 10);
    //渲染
    CGContextStrokePath(cxContext);
}
效果图:

到这里简单绘制直线我们已经可以掌握了,但是如果多考率一下的话不难想到,如果我们现在花两条没有交点的线(我们可以通过CGContextAddLineToPoint继续添加线)该如何区分呢。
下面介绍一下路径path,我们可以通过它绘制线并且区分。
示例代码:
- (void)drawRect:(CGRect)rect{
    //获取图形上下文
    CGContextRef cxContext = UIGraphicsGetCurrentContext();
    //创建2条路径
    CGMutablePathRef path1 = CGPathCreateMutable();
    CGMutablePathRef path2 = CGPathCreateMutable();
    //开始画图
    //绘制第一条直线
    CGPathMoveToPoint(path1, NULL, 0, 20);
    CGPathAddLineToPoint(path1, NULL, 100, 20);
    //绘制第二条直线
    CGPathMoveToPoint(path2, NULL, 0, 50);
    CGPathAddLineToPoint(path2, NULL, 100, 50);
    //把路径添加到上下文中
    CGContextAddPath(cxContext, path1);
    CGContextAddPath(cxContext, path2);
    //渲染
    CGContextStrokePath(cxContext);
    //释放 因为是CG所以需要手动释放
    CGPathRelease(path1);
    CGPathRelease(path2);
}
效果图:
第二部分 绘制图形
示例代码:
- (void)drawRect:(CGRect)rect{
    //获取图形上下文
    CGContextRef cxContext = UIGraphicsGetCurrentContext();
    //绘制矩形
    CGContextAddRect(cxContext, CGRectMake(20, 20, 100, 100));
    //渲染
    CGContextStrokePath(cxContext);

}
效果图:

示例代码:
- (void)drawRect:(CGRect)rect{

    //获取图形上下文
    CGContextRef cxContext = UIGraphicsGetCurrentContext();
    //绘制圆
    CGContextAddArc(cxContext, 100, 100, 25, 0, M_PI, 0);
    //渲染
    CGContextStrokePath(cxContext);

}
效果图:

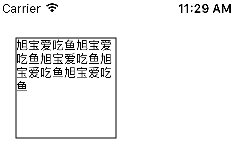
第三部分 绘制文字
示例代码:
- (void)drawRect:(CGRect)rect{
    //获取图形上下文
    CGContextRef cxContext = UIGraphicsGetCurrentContext();
    //绘制矩形
    CGContextAddRect(cxContext, CGRectMake(20, 20, 100, 100));
    //渲染
    CGContextStrokePath(cxContext);
    //文字内容
    NSString *str = @"旭宝爱吃鱼旭宝爱吃鱼旭宝爱吃鱼旭宝爱吃鱼旭宝爱吃鱼";
    //将文字绘制到指定区域 自动换行 抽出范围后不显示
    [str drawInRect:CGRectMake(20, 20, 100, 100) withAttributes:nil];
    //将文字绘制到指定点
//    [str drawAtPoint:CGPointMake(0, 0) withAttributes:nil];

}
效果图:
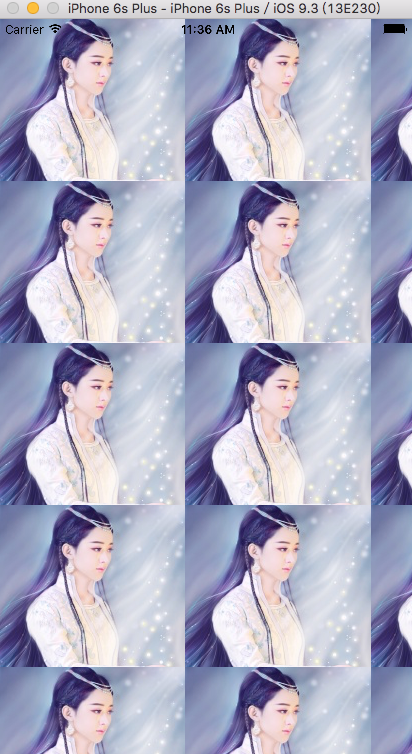
第四部分 绘制图片
实例代码:
- (void)drawRect:(CGRect)rect{

    UIImage * image = [UIImage imageNamed:@"2.jpg"];

    //平铺
    [image drawAsPatternInRect:self.bounds];

}
效果图:
示例代码:
- (void)drawRect:(CGRect)rect{

    UIImage * image = [UIImage imageNamed:@"2.jpg"];