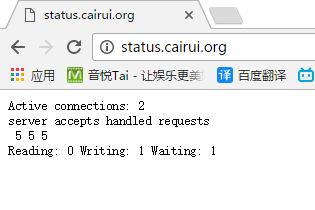
主机,再上网页查看
添加状态的server标签:
[root@localhost conf]# vim /application/nginx/conf/nginx.conf
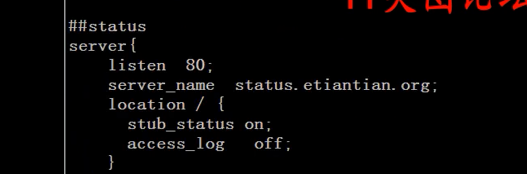
##status
server {
listen 80;
server_name status.cairui.org;
location / {
stub_status on;
access_log off;
}
}
在win本地hosts文件中也要添加,
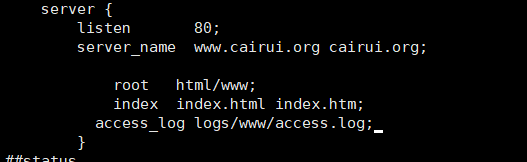
解决恶意域名绑定:
[root@localhost conf]# vim /application/nginx/conf/nginx.conf(必须放在第一个server)
server {
listen 80;
location / {
deny all;
}
}
开启日志功能:
[root@localhost conf]# cat /application/nginx/conf/nginx.conf.default (找到日志格式)
#log_format main '$remote_addr - $remote_user [$time_local] "$request" '
# '$status $body_bytes_sent "$http_referer" '
# '"$http_user_agent" "$http_x_forwarded_for"';
#access_log logs/access.log main;
拷贝到nginx.conf下,去掉注释

错误日志格式放在最顶端
分析nginx日志的软件:syslog,rsyslog,Awstats,scribe,kafka
Mysql
mysql安装方法:
5.1---编译安装configure,make,make install
5.5---编译安装cmake,make,make install(可以直接用二进制包安装,解压即可)
1.安装mysql
[root@localhost conf]# useradd mysql -s /sbin/nologin -M
[root@localhost tools]# tar xf mysql-5.5.32-linux2.6-x86_64.tar.gz
[root@localhost tools]# mv mysql-5.5.32-linux2.6-x86_64 /application/mysql5.5.32
[root@localhost tools]# ln -s /application/mysql5.5.32/ /application/mysql
[root@localhost tools]# chown -R mysql.mysql /application/mysql/data/
[root@localhost mysql]# ./scripts/mysql_install_db --user=mysql --basedir=/application/mysql/ --datadir=/application/mysql/data/(编译之前需要安装libaio)
[root@localhost mysql]# cp support-files/mysql.server /etc/init.d/mysqld
[root@localhost mysql]# vim /etc/init.d/mysqld

[root@localhost mysql]# cp support-files/my-small.cnf /etc/my.cnf (每个版本的配置文件不同)
cp:是否覆盖"/etc/my.cnf"? y
[root@localhost mysql]# vim /etc/profile

[root@localhost mysql]# service mysqld start
Starting MySQL.. SUCCESS!
[root@localhost mysql]# mysql
数据库优化:
mysql> show databases
mysql> drop Database test;
mysql> select user,host from mysql.user;
mysql> drop user''@localhost;
[root@localhost mysql]# mysql -uroot -pnew