目录
0.码仙励志
1.开发环境要求
2.创建项目
3.编写jar包的依赖信息
4.远程操作HDFS的代码实现
(1)import一些需要用到的类
(2)远程连接HDFS系统的代码实现
(3)创建hdfs文件夹的代码实现
(4)实现往HDFS上传文件的代码
(5)从HDFS下载文件到本地代码实现
(6)在运行中读取HDFS文件的代码实现
(7)HDFS文件重命名代码实现
(8)在程序中创建文件的代码实现
(9)追加内容到某个文件的代码实现
(10)删除HDFS文件的代码实现
(11)整篇代码
0.码仙励志
你害怕一件事,可还是要去做,那才是勇敢
1.开发环境要求
- java jdk 1.8
- eclipse 2018
- maven 2.7.5
- 远程HDFS服务支持
2.创建项目
首先打开eclipse,创建maven项目


创建完毕后检查下jdk版本是否正确,在鼠标移动到项目上点击鼠标右键->Build Path-> Configure Build Path,如下图操作


3.编写jar包的依赖信息
我们开始进入编码工作,由于我们创建的是maven工程,所以要编写pom.xml文件,下面是我编写好的pom.xml文件
<project xmlns="http://maven.apache.org/POM/4.0.0"
	xmlns:xsi="http://www.w3.org/2001/XMLSchema-instance"
	xsi:schemaLocation="http://maven.apache.org/POM/4.0.0 http://maven.apache.org/xsd/maven-4.0.0.xsd">
	<modelVersion>4.0.0</modelVersion>

	<groupId>com.maxian</groupId>
	<artifactId>hdfs</artifactId>
	<version>0.0.1-SNAPSHOT</version>
	<packaging>jar</packaging>

	<name>hdfs</name>
	<url>http://maven.apache.org</url>

	<properties>
		<project.build.sourceEncoding>UTF-8</project.build.sourceEncoding>
		<hadoop.version>2.7.5</hadoop.version>
	</properties>

	<dependencies>
		<dependency>
			<groupId>junit</groupId>
			<artifactId>junit</artifactId>
			<version>3.8.1</version>
			<scope>test</scope>
		</dependency>
		<dependency>
			<groupId>org.apache.hadoop</groupId>
			<artifactId>hadoop-mapreduce-client-common</artifactId>
			<version>${hadoop.version}</version>
		</dependency>
		<dependency>
			<groupId>org.apache.hadoop</groupId>
			<artifactId>hadoop-mapreduce-client-jobclient</artifactId>
			<version>${hadoop.version}</version>
			<scope>provided</scope>
		</dependency>
		<dependency>
			<groupId>org.apache.hadoop</groupId>
			<artifactId>hadoop-client</artifactId>
			<version>${hadoop.version}</version>
		</dependency>
		<dependency>
			<groupId>org.apache.hadoop</groupId>
			<artifactId>hadoop-yarn-common</artifactId>
			<version>${hadoop.version}</version>
		</dependency>
		<dependency>
			<groupId>org.apache.hadoop</groupId>
			<artifactId>hadoop-mapreduce-client-core</artifactId>
			<version>${hadoop.version}</version>
		</dependency>
		<dependency>
			<groupId>org.apache.hadoop</groupId>
			<artifactId>hadoop-hdfs</artifactId>
			<version>${hadoop.version}</version>
		</dependency>
		<dependency>
			<groupId>jdk.tools</groupId>
			<artifactId>jdk.tools</artifactId>
			<version>1.8</version>
			<scope>system</scope>
			<systemPath>${JAVA_HOME}/lib/tools.jar</systemPath>
		</dependency>
	</dependencies>
	<build>
		<plugins>
			<plugin>
				<groupId>org.apache.maven.plugins</groupId>
				<artifactId>maven-compiler-plugin</artifactId>
				<configuration>
					<source>1.8</source>
					<target>1.8</target>
				</configuration>
			</plugin>
		</plugins>
	</build>
</project>
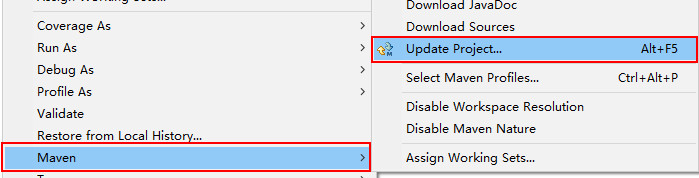
编写完毕后保存,在工程根目录点鼠标右键->Maven ->Update Project。

4.远程操作HDFS的代码实现
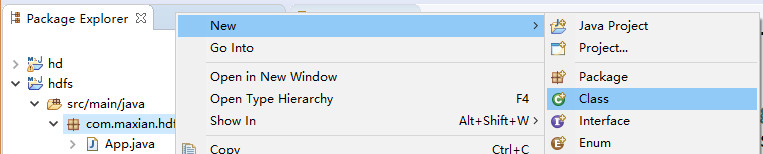
首先先在com.maxian.hdfs包下创建一个叫TestHdfs的类

(1)import一些需要用到的类
现在我们可以开始编写JAVA代码了,打开com.maxian.hdfs下的TestHdfs.java类,import一些需要用到的类:
import java.io.File;
import java.io.IOException;
import java.io.InputStream;
import java.security.PrivilegedExceptionAction;
import org.apache.hadoop.conf.Configuration;
import org.apache.hadoop.fs.FSDataOutputStream;
import org.apache.hadoop.fs.FileStatus;
import org.apache.hadoop.fs.FileSystem;
import org.apache.hadoop.fs.Path;
import org.apache.hadoop.io.IOUtils;
import org.apache.hadoop.security.UserGroupInformation;
(2)远程连接HDFS系统的代码实现
之后我们实例化Configuration和定义FileSystem 这两个静态常量,FileSystem是一个实现了文件系统的抽象类,继承自org.apache.hadoop.conf.Configured,并实现了 Closeable接口,可以适用于多种文件系统,如本地文件系统 file://、ftp、hdfs等。 代码如下:
static Configuration conf = new Configuration();
static FileSystem hdfs;
接着编写远程连接HDFS系统的一些配置信息,代码如下:
static {
	UserGroupInformation ugi = UserGroupInformation.createRemoteUser("root");
	try {
		ugi.doAs(new PrivilegedExceptionAction<Void>() {
			public Void run() throws Exception {
				Configuration conf = new Configuration();
				conf.set("fs.defaultFS", "hdfs://192.168.56.110:9000/");
				// 以下两行是支持 hdfs的追加功能的:hdfs.append()
				conf.set("dfs.client.block.write.replace-datanode-on-failure.policy", "NEVER");
				conf.set("dfs.client.block.write.replace-datanode-on-failure.enable", "true");
				Path path = new Path("hdfs://192.168.56.110:9000/");
				hdfs = FileSystem.get(path.toUri(), conf);
				// hdfs = path.getFileSystem(conf); // 这个也可以
				return null;
			}
		});
	} catch (IOException e) {
		e.printStackTrace();
	} catch (InterruptedException e) {
		e.printStackTrace();
	}
}
(3)创建hdfs文件夹的代码实现
// 创建文件夹方法
public static void createDir(String dir) throws IOException {
	// String dir = "/test3/";
	Path path = new Path(dir);
	// 判断文件夹是否已存在,如果已存在就不再创建。
	if (hdfs.exists(path)) {
		System.out.println("文件夹 \t" + dir + "\t 已存在");
		return;
	}
	// 开始创建文件夹
	hdfs.mkdirs(path);
	System.out.println("新建文件夹 \t" + dir);
}
代码编写完毕后,我们在入口方法main调用createDir方法进行验证,代码如下:
public static void main( String[] args ) throws IOException
{
    createDir("/test1");
}
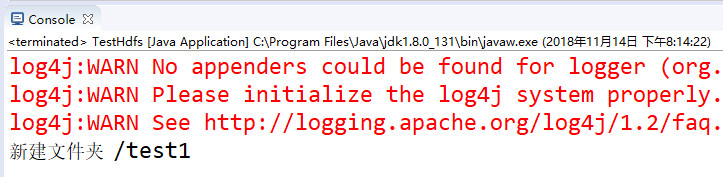
现在我们可以开始来验证代码是否可行,首先确认集群的hadoop的dfs服务是否已经启动,确认dfs已经正常启动后,我们在该类的编辑界面上右击鼠标,在弹出的菜单中选中Run As -> Java Application开始运行该类。

执行完后我们会在Console中看到相应的执行结果。也可以在集群的master主机中验证是否执行成功,在master中输入命令“hadoop fs -ls /”查看hdfs根目录的文件,如果得到如下图结果证明文件夹创建成功。

(4)实现往HDFS上传文件的代码
// 复制本地文件到HDFS
public static void copyFile(String localSrc, String hdfsDst, String fileName) throws IOException {
	if ("".equals(localSrc)) {
		localSrc = "D:/wordcount/input/myfile.txt";
	}
	if ("".equals(hdfsDst)) {
		hdfsDst = "/test/";
	}
	Path src = new Path(localSrc);
	Path dst = new Path(hdfsDst);
	// 本地文件不存在
	if (!(new File(localSrc)).exists()) {
		System.out.println("Error: 本地文件 \t" + localSrc + "\t 不存在。");
		return;
	}
	// hdfs路径不存在
	if (!hdfs.exists(dst)) {
		System.out.println("Error: hdfs目录 \t" + dst.toUri() + "\t 不存在。");
		return;
	}
	if ("".equals(fileName)) {
		fileName = src.getName();
	}
	String dstPath = dst.toUri() + "/" + fileName;
	System.out.println(dstPath); // "/test2/myfile.txt"
	Path targetPath = new Path(dstPath);
	// 判断上传的文件 hdfs的目录下是否存在
	if (hdfs.exists(targetPath)) {
		System.out.println("Warn: 文件 \t" + dstPath + "\t 已存在。");
	} else {
		// 本地文件上传hdfs
		hdfs.copyFromLocalFile(src, targetPath);
		// 遍历该目录文件
		FileStatus files[] = hdfs.listStatus(dst);
		System.out.println("上传到 \t" + conf.get("fs.defaultFS") + hdfsDst);
		for (FileStatus file : files) {
			System.out.println(file.getPath());
		}
	}
}
代码编写完成后,我们也来运行验证下,在main中注释掉之前的createDir方法,将copyFile方法写进去,代码如下:
public static void main(String[] args) throws IOException {
	//createDir("/test1");
	copyFile("D:/wordcount/input/myfile.txt","/test1/","myfile.txt");
}
编写完毕后一样在该类的编辑界面上右击鼠标,在弹出的菜单中选中 Run As -> Java Application开始运行该类。执行完后我们会在Console中看到相应的执行结果。也可以在集群的master主机中验证是否执行成功,在master中输入命令“hadoop fs -ls /test1/”查看test1目录的文件,如果得到如下图结果证明文件上传成功。

(5)从HDFS下载文件到本地代码实现
// 下载文件方法
public static void downloadFile() throws IllegalArgumentException, IOException {
	String hdfsDst = "/test1/myfile.txt";
	String localSrc = "D:/test";
	Path dst = new Path(hdfsDst);
	Path src = new Path(localSrc);
	String localFile = localSrc + "/" + dst.getName(); // 本地的路径 + hdfs下载的文件名
	if (!hdfs.exists(dst.getParent())) { // 如果HDFS路径不存在
		System.out.println("Error : HDFS路径:\t" + dst.getParent() + "\t 不存在!");
		return;
	}
	if (!new File(localSrc).exists()) { // 如果本地目录不存在,则创建
		new File(localSrc).mkdirs();
		System.out.println("Warn : 本地目录已创建!");
	}
	if (new File(localFile).exists()) { // 如果本地文件存在
		System.out.println("Error : 本地文件: \t" + localFile + "\t 已存在.");
		return;
	}
	if (!hdfs.exists(new Path(hdfsDst))) { // 如果HDFS文件不存在
		System.out.println("Error : HDFS文件: \t" + hdfsDst + "\t 不存在.");
	} else {
		// HDFS下载文件到本地
		hdfs.copyToLocalFile(false, dst, src, true);
		System.out.println("successful :下载成功! 请查看: \t" + localSrc);
	}
}
代码编写完成后,我们也来运行验证下,在main中注释掉之前的copyFile方法,将downloadFile方法写进去,代码如下:
public static void main(String[] args) throws IOException {
	downloadFile();
}

(6)在运行中读取HDFS文件的代码实现
// 读取文件方法
public static void readFile() throws IOException {
	String uri = "/test1/myfile.txt";
	// 判断文件是否存在
	if (!hdfs.exists(new Path(uri))) {
		System.out.println("Error ; 文件不存在.");
		return;
	}
	InputStream in = null;
	try {
		in = hdfs.open(new Path(uri));
		// 复制到标准输出流
		IOUtils.copyBytes(in, System.out, 4096, false);
	} catch (Exception e) {
		e.printStackTrace();
	} finally {
		IOUtils.closeStream(in);
	}
}
代码编写完成后,我们也来运行验证下,在main中注释掉之前的downloadFile方法,将readFile方法写进去,代码如下:
public static void main(String[] args) throws IOException {
	readFile();
}

(7)HDFS文件重命名代码实现
// 重命名方法
public static void renameFile() throws IOException {
	String oldName = "/test1/myfile.txt";
	String newName = "/test1/readme_1.txt";
	Path oldPath = new Path(oldName);
	Path newPath = new Path(newName);
	if (hdfs.exists(oldPath)) {
		hdfs.rename(oldPath, newPath);
		System.out.println("rename成功!");
	} else {
		System.out.println("文件不存在!rename失败!");
	}
}
代码编写完成后,我们也来运行验证下,在main中注释掉之前的readFile方法,将renameFile方法写进去,代码如下:
public static void main(String[] args) throws IOException {
	renameFile();
}
编写完毕后一样在该类的编辑界面上右击鼠标,在弹出的菜单中选中Run As -> Java Application开始运行该类。执行完后我们会在Console中看到相应的执行结果。也可以在集群的master主机中验证是否执行成功,在master中输入命令“hadoop fs -ls /test1/”查看test1目录的文件,查看文件名是否已经重命名,如果得到如下图结果证明文件重命名成功。

(8)在程序中创建文件的代码实现
// 创建文件方法
public static void createFile() throws IOException {
	String fileName = "/test1/file1.txt";
	String fileContent = "this is new file.";
	Path dst = new Path(fileName);
	// 判断 新建的文件在hdfs上是否存在
	if (hdfs.exists(dst)) {
		System.out.println("Error : 文件已存在.");
	} else {
		// 将文件内容转成字节数组
		byte[] bytes = fileContent.getBytes();
		FSDataOutputStream output = hdfs.create(dst);
		output.write(bytes);
		output.close();
		System.out.println("创建文件 \t" + fileName);
	}
}
代码编写完成后,我们也来运行验证下,在main中注释掉之前的renameFile方法,将createFile方法写进去,代码如下:
public static void main(String[] args) throws IOException {
	createFile();
}

接着看一下该文件里面的内容

(9)追加内容到某个文件的代码实现
// 追加内容方法
public static void appendFile() throws IOException {
	String fileName = "/test1/file1.txt";
	String fileContent = "Here is an additional content";
	Path dst = new Path(fileName);
	byte[] bytes = fileContent.getBytes();
	// 如果文件不存在
	if (!hdfs.exists(dst)) {
		System.out.println("Error : 文件不存在。");
		return;
	}
	FSDataOutputStream output = hdfs.append(dst);
	output.write(bytes);
	output.close();
	System.out.println("successful: 追加内容到 \t" + fileName);
}
代码编写完成后,我们一样也来运行验证下,在main中注释掉之前的createFile方法,将appendFile方法写进去,代码如下:
public static void main(String[] args) throws IOException {
	appendFile();
}

(10)删除HDFS文件的代码实现
//删除HDFS文件的代码实现
public static void deleteFile(String fileName) throws IOException {
    if("".equals(fileName)) {
    fileName = "/test2/file1.txt";
    }
        Path f = new Path(fileName);
        boolean isExists = hdfs.exists(f);
        if (isExists) { // if exists, delete
            boolean isDel = hdfs.delete(f, true);
            System.out.println(fileName + "  删除状态:  " + isDel);
        } else {
            System.out.println(fileName + "  文件不存在。");
        }
}
代码编写完成后,我们一样也来运行验证下,在main中注释掉之前的appendFile方法,将deleteFile方法写进去,代码如下:
public static void main(String[] args) throws IOException {
	deleteFile("/test1/file1.txt");
}
编写完毕后一样在该类的编辑界面上右击鼠标,在弹出的菜单中选中Run As -> Java Application开始运行该类。执行完后我们会在Console中看到相应的执行结果。也可以在集群的master主机中验证是否执行成功,在master中输入命令“hadoop fs -ls /test1/”查看test1目录的file1.txt文件是否已经被删除。

(11)整篇代码
package com.maxian.hdfs;

import java.io.File;
import java.io.IOException;
import java.io.InputStream;
import java.security.PrivilegedExceptionAction;
import org.apache.hadoop.conf.Configuration;
import org.apache.hadoop.fs.FSDataOutputStream;
import org.apache.hadoop.fs.FileStatus;
import org.apache.hadoop.fs.FileSystem;
import org.apache.hadoop.fs.Path;
import org.apache.hadoop.io.IOUtils;
import org.apache.hadoop.security.UserGroupInformation;

public class TestHdfs {

	static Configuration conf = new Configuration();
	static FileSystem hdfs;
	static {
		UserGroupInformation ugi = UserGroupInformation.createRemoteUser("root");
		try {
			ugi.doAs(new PrivilegedExceptionAction<Void>() {
				public Void run() throws Exception {
					Configuration conf = new Configuration();
					conf.set("fs.defaultFS", "hdfs://192.168.56.110:9000/");
					// 以下两行是支持 hdfs的追加功能的:hdfs.append()
					conf.set("dfs.client.block.write.replace-datanode-on-failure.policy", "NEVER");
					conf.set("dfs.client.block.write.replace-datanode-on-failure.enable", "true");
					Path path = new Path("hdfs://192.168.56.110:9000/");
					hdfs = FileSystem.get(path.toUri(), conf);
					// hdfs = path.getFileSystem(conf); // 这个也可以
					return null;
				}
			});
		} catch (IOException e) {
			e.printStackTrace();
		} catch (InterruptedException e) {
			e.printStackTrace();
		}
	}

	// 创建文件夹方法
	public static void createDir(String dir) throws IOException {
		// String dir = "/test3/";
		Path path = new Path(dir);
		// 判断文件夹是否已存在,如果已存在就不再创建。
		if (hdfs.exists(path)) {
			System.out.println("文件夹 \t" + dir + "\t 已存在");
			return;
		}
		// 开始创建文件夹
		hdfs.mkdirs(path);
		System.out.println("新建文件夹 \t" + dir);
	}

	// 复制本地文件到HDFS
	public static void copyFile(String localSrc, String hdfsDst, String fileName) throws IOException {
		if ("".equals(localSrc)) {
			localSrc = "D:/wordcount/input/myfile.txt";
		}
		if ("".equals(hdfsDst)) {
			hdfsDst = "/test/";
		}
		Path src = new Path(localSrc);
		Path dst = new Path(hdfsDst);
		// 本地文件不存在
		if (!(new File(localSrc)).exists()) {
			System.out.println("Error: 本地文件 \t" + localSrc + "\t 不存在。");
			return;
		}
		// hdfs路径不存在
		if (!hdfs.exists(dst)) {
			System.out.println("Error: hdfs目录 \t" + dst.toUri() + "\t 不存在。");
			return;
		}
		if ("".equals(fileName)) {
			fileName = src.getName();
		}
		String dstPath = dst.toUri() + "/" + fileName;
		System.out.println(dstPath); // "/test2/myfile.txt"
		Path targetPath = new Path(dstPath);
		// 判断上传的文件 hdfs的目录下是否存在
		if (hdfs.exists(targetPath)) {
			System.out.println("Warn: 文件 \t" + dstPath + "\t 已存在。");
		} else {
			// 本地文件上传hdfs
			hdfs.copyFromLocalFile(src, targetPath);
			// 遍历该目录文件
			FileStatus files[] = hdfs.listStatus(dst);
			System.out.println("上传到 \t" + conf.get("fs.defaultFS") + hdfsDst);
			for (FileStatus file : files) {
				System.out.println(file.getPath());
			}
		}
	}

	// 下载文件方法
	public static void downloadFile() throws IllegalArgumentException, IOException {
		String hdfsDst = "/test1/myfile.txt";
		String localSrc = "D:/test";
		Path dst = new Path(hdfsDst);
		Path src = new Path(localSrc);
		String localFile = localSrc + "/" + dst.getName(); // 本地的路径 + hdfs下载的文件名
		if (!hdfs.exists(dst.getParent())) { // 如果HDFS路径不存在
			System.out.println("Error : HDFS路径:\t" + dst.getParent() + "\t 不存在!");
			return;
		}
		if (!new File(localSrc).exists()) { // 如果本地目录不存在,则创建
			new File(localSrc).mkdirs();
			System.out.println("Warn : 本地目录已创建!");
		}
		if (new File(localFile).exists()) { // 如果本地文件存在
			System.out.println("Error : 本地文件: \t" + localFile + "\t 已存在.");
			return;
		}
		if (!hdfs.exists(new Path(hdfsDst))) { // 如果HDFS文件不存在
			System.out.println("Error : HDFS文件: \t" + hdfsDst + "\t 不存在.");
		} else {
			// HDFS下载文件到本地
			hdfs.copyToLocalFile(false, dst, src, true);
			System.out.println("successful :下载成功! 请查看: \t" + localSrc);
		}
	}

	// 读取文件方法
	public static void readFile() throws IOException {
		String uri = "/test1/myfile.txt";
		// 判断文件是否存在
		if (!hdfs.exists(new Path(uri))) {
			System.out.println("Error ; 文件不存在.");
			return;
		}
		InputStream in = null;
		try {
			in = hdfs.open(new Path(uri));
			// 复制到标准输出流
			IOUtils.copyBytes(in, System.out, 4096, false);
		} catch (Exception e) {
			e.printStackTrace();
		} finally {
			IOUtils.closeStream(in);
		}
	}

	// 重命名方法
	public static void renameFile() throws IOException {
		String oldName = "/test1/myfile.txt";
		String newName = "/test1/readme_1.txt";
		Path oldPath = new Path(oldName);
		Path newPath = new Path(newName);
		if (hdfs.exists(oldPath)) {
			hdfs.rename(oldPath, newPath);
			System.out.println("rename成功!");
		} else {
			System.out.println("文件不存在!rename失败!");
		}
	}

	// 创建文件方法
	public static void createFile() throws IOException {
		String fileName = "/test1/file1.txt";
		String fileContent = "this is new file.";
		Path dst = new Path(fileName);
		// 判断 新建的文件在hdfs上是否存在
		if (hdfs.exists(dst)) {
			System.out.println("Error : 文件已存在.");
		} else {
			// 将文件内容转成字节数组
			byte[] bytes = fileContent.getBytes();
			FSDataOutputStream output = hdfs.create(dst);
			output.write(bytes);
			output.close();
			System.out.println("创建文件 \t" + fileName);
		}
	}

	// 追加内容方法
	public static void appendFile() throws IOException {
		String fileName = "/test1/file1.txt";
		String fileContent = "Here is an additional content";
		Path dst = new Path(fileName);
		byte[] bytes = fileContent.getBytes();
		// 如果文件不存在
		if (!hdfs.exists(dst)) {
			System.out.println("Error : 文件不存在。");
			return;
		}
		FSDataOutputStream output = hdfs.append(dst);
		output.write(bytes);
		output.close();
		System.out.println("successful: 追加内容到 \t" + fileName);
	}

	// 删除HDFS文件的代码实现
	public static void deleteFile(String fileName) throws IOException {
		if ("".equals(fileName)) {
			fileName = "/test2/file1.txt";
		}
		Path f = new Path(fileName);
		boolean isExists = hdfs.exists(f);
		if (isExists) { // if exists, delete
			boolean isDel = hdfs.delete(f, true);
			System.out.println(fileName + "  删除状态:  " + isDel);
		} else {
			System.out.println(fileName + "  文件不存在。");
		}
	}

	public static void main(String[] args) throws IOException {
//		createDir("/test1");
//		copyFile("D:/wordcount/input/myfile.txt", "/test1/", "myfile.txt");
//		downloadFile();
//		readFile();
//		renameFile();
//		createFile();
//		appendFile();
		deleteFile("/test1/file1.txt");
	}
}