5056f680b0 172.20.10.7:7001
slots:[0-5460] (5461 slots) master
M: d6fed6f21269b8469a3076ac5fb168bd20f70c26 172.20.10.7:7002
slots:[5461-10922] (5462 slots) master
M: 51a0f62dacead745ce5351cdbe0bdbae553ce413 172.20.10.7:7003
slots:[10923-16383] (5461 slots) master
S: 45cc35740ac67f7988bb75325871ba12d08a76e4 172.20.10.7:7004
replicates a4128b5e581c3722acd9b093c5f29f5056f680b0
S: 668054fe16cdf8741152cae863f5c636ed18b803 172.20.10.7:7005
replicates d6fed6f21269b8469a3076ac5fb168bd20f70c26
S: ae39b7db285703f8c08412d6b04998c60a634295 172.20.10.7:7006
replicates 51a0f62dacead745ce5351cdbe0bdbae553ce413
Can I set the above configuration? (type 'yes' to accept):yes
输入yes回车
>>> Nodes configuration updated
>>> Assign a different config epoch to each node
>>> Sending CLUSTER MEET messages to join the cluster
Waiting for the cluster to join
......
>>> Performing Cluster Check (using node 172.20.10.7:7001)
M: a4128b5e581c3722acd9b093c5f29f5056f680b0 172.20.10.7:7001
slots:[0-5460] (5461 slots) master
1 additional replica(s)
M: d6fed6f21269b8469a3076ac5fb168bd20f70c26 172.20.10.7:7002
slots:[5461-10922] (5462 slots) master
1 additional replica(s)
S: 45cc35740ac67f7988bb75325871ba12d08a76e4 172.20.10.7:7004
slots: (0 slots) slave
replicates a4128b5e581c3722acd9b093c5f29f5056f680b0
M: 51a0f62dacead745ce5351cdbe0bdbae553ce413 172.20.10.7:7003
slots:[10923-16383] (5461 slots) master
1 additional replica(s)
S: 668054fe16cdf8741152cae863f5c636ed18b803 172.20.10.7:7005
slots: (0 slots) slave
replicates d6fed6f21269b8469a3076ac5fb168bd20f70c26
S: ae39b7db285703f8c08412d6b04998c60a634295 172.20.10.7:7006
slots: (0 slots) slave
replicates 51a0f62dacead745ce5351cdbe0bdbae553ce413
[OK] All nodes agree about slots configuration.
>>> Check for open slots...
>>> Check slots coverage...
[OK] All 16384 slots covered.
至此,Reids5 集群搭建完成。
6、集群的操作
6.1、关闭集群
方法一:
redis5 提供了关闭集群的工具,在如下目录:
/root/redis-5.0.0/utils/create-cluster
打开此文件修改端口为我们自己的,如下所示:
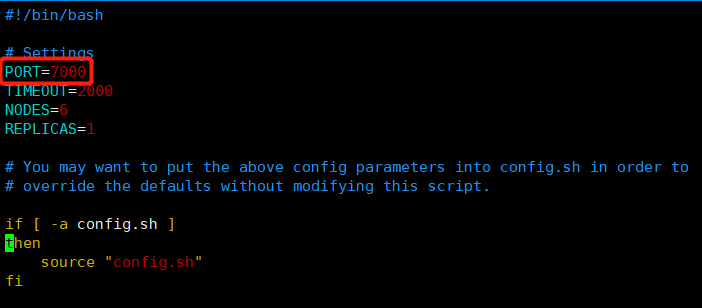
端口PROT设置为7000,NODES为6,工具会自动累加1 生成 7001-7006 六个节点 用于操作。
往下看再修改路径 和 添加 ip地址,如果不加会默认本地127.0.0.1

修改后,执行如下命令关闭集群:
/root/redis-5.0.0/utils/create-cluster/create-cluster stop
方法二:
create-cluster目录下编写脚本文件:vim shutdown.sh
内容如下:
/usr/local/redis-cluster/redis-cli -c -h 172.20.10.7 -p 7001 shutdown
/usr/local/redis-cluster/redis-cli -c -h 172.20.10.7 -p 7002 shutdown
/usr/local/redis-cluster/redis-cli -c -h 172.20.10.7 -p 7003 shutdown
/usr/local/redis-cluster/redis-cli -c -h 172.20.10.7 -p 7004 shutdown
/usr/local/redis-cluster/redis-cli -c -h 172.20.10.7 -p 7005 shutdown
/usr/local/redis-cluster/redis-cli -c -h 172.20.10.7 -p 7006 shutdown
然后执行chmod u+x shutdown.sh将shutdown.sh变成可执行文件
在当前目录下启动: ./shutdown.sh
查看:ps aux|grep redis
官方:/usr/local/redis-cluster/redis-cli -a xxx -c -h 192.168.5.100 -p 8001
提示:-a访问服务端密码,-c表示集群模式,-h指定ip地址,-p指定端口号
6.2、重新启动集群
/root/redis-5.0.0/utils/create-cluster/create-cluster start
6.3、使用脚本文件启动集群
vim startall.sh 追加如下内容:(记得改自己ip地址)
/usr/local/redis-cluster/redis-cli --cluster create 172.20.10.7:7001 172.20.10.7:7002 172.20.10.7:7003 172.20.10.7:7004 172.20.10.7:7005 172.20.10.7:7006 --cluster-replicas 1
启动:./startall.sh