springcloud用法
使用springcloud搭建微服务肯定要在父工程下面编写子工程
一.搭建eureka注册中心
1. 创建maven项目(在springboot项目下建立子工程eureka-server)
2. 导入坐标
| <dependencies>
<dependency>
<groupId>org.springframework.cloud</groupId>
<artifactId>spring-cloud-starter-netflix-eureka-server</artifactId>
</dependency>
</dependencies> |
3. 创建引导类
@SpringBootApplication

  @EnableEurekaServer  //添加注解 表名服务,声明这个应用时EurekaServer

  public class EurekaManager {

    public static void main(String[] args) {

        SpringApplication.run(EurekaManager.class,args);

    }

} |
4. 编写配置文件
编写application.yml文件
server:

  port: 10086

  spring:

  application:

    name: eureka-server  #自己注册的serviceId,即注册名称
  eureka:

  client:

    service-url:

      defaultZone: http://127.0.0.1:10086/eureka
    register-with-eureka: true   #注册自己,默认为true

    fetch-registry: true  #拉取服务,默认为true
|
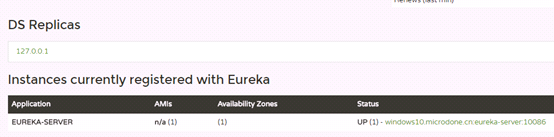
5. 效果截图
二.搭建提供者,user-service
提供者user-service对于注册中心而言还是客户端
1. 创建maven工程user-service
2. 导入坐标
<!--添加坐标-->

  <dependencies>

    <dependency>

        <groupId>org.springframework.boot</groupId>

        <artifactId>spring-boot-starter-web</artifactId>

    </dependency>


    <dependency>

        <groupId>mysql</groupId>

        <artifactId>mysql-connector-java</artifactId>

    </dependency>


    <dependency>

        <groupId>tk.mybatis</groupId>

        <artifactId>mapper-spring-boot-starter</artifactId>

    </dependency>


      <dependency>

        <groupId>org.springframework.cloud</groupId>

        <artifactId>spring-cloud-starter-netflix-eureka-client</artifactId>

    </dependency>


</dependencies> |
3. 编写启动类
package com.ahd;


  import org.springframework.boot.SpringApplication;

  import org.springframework.boot.autoconfigure.SpringBootApplication;

  import org.springframework.cloud.client.discovery.EnableDiscoveryClient;

  import org.springframework.context.annotation.Bean;

impor |