一. 概述
本篇开始进入IS4实战学习,从第一个示例开始,该示例是 “使用客户端凭据保护API”,这是使用IdentityServer保护api的最基本场景。该示例涉及到三个项目包括:IdentityServer项目、API项目、Client项目,都有自己的宿主,为了方便开发,放在了一个解决方案下(Quickstart.sln),三个项目的分工如下:
(1) IdentityServer项目是包含基本的IdentityServer设置的ASP.NET Core应用程序,是令牌端点。
(2) API项目是Web Api,是要保护的资源。
(3) Client项目是客户端用户,用来访问Web Api。
最后客户端Client项目请求获取IdentityServer上的访问令牌。作为客户端Client和IdentityServer都知道secret密钥,Client将使用令牌访问Web API。开源地址Github
二. 创建IdentityServer项目
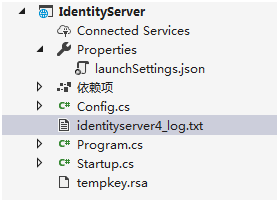
创建一个ASP.NET Core Web(或空)模板。项目名为IdentityServer,解决方案为Quickstart。是一个包含基本IdentityServer设置的ASP.NET Core应用程序。该项目使用的协议是http,当在Kestrel上运行时,端口设置为5000或在IISExpress上的随机端口。
首次启动时,IdentityServer将为您创建一个开发人员签名密钥,它是一个名为的文件tempkey.rsa。您不必将该文件检入源代码管理中,如果该文件不存在,将重新创建该文件。项目最终目录结构如下所示:
下面进行说明,以及用序号来表示开发实现步骤:
2.1 安装:Install-Package IdentityServer4
2.2 新增Config.cs文件, 该文件是IdentityServer资源和客户端配置文件。在该文件中定义API资源,以及定义客户端(可以访问此API的客户端)
        /// <summary>
        /// 定义API资源,要保护的资源
        /// </summary>
        /// <returns></returns>
        public static IEnumerable<ApiResource> GetApis()
        {
            return new List<ApiResource>
            {
                new ApiResource("api1", "My API")
            };
        }
        /// <summary>
        /// 定义客户端,可以访问此API的客户端
        /// </summary>
        /// <returns></returns>
        public static IEnumerable<Client> GetClients()
        {
            return new List<Client>
            {
                new Client
                {
                    ClientId = "client",

                    // no interactive user, use the clientid/secret for authentication
                    AllowedGrantTypes = GrantTypes.ClientCredentials,

                    //使用密钥进行身份认证  secret for authentication
                    ClientSecrets =
                    {
                        new Secret("secret".Sha256())
                    },

                    //客户端允许访问的范围
                    AllowedScopes = { "api1" }
                }
            };
        }
2.3 Startup配置
        /// <summary>
        /// 配置IdentityServer,加载API资源和客户端
        /// </summary>
        /// <param name="services"></param>
        public void ConfigureServices(IServiceCollection services)
        {
            // uncomment, if you wan to add an MVC-based UI
            //services.AddMvc().SetCompatibilityVersion(Microsoft.AspNetCore.Mvc.CompatibilityVersion.Version_2_1);
             //添加AddIdentityServer
            var builder = services.AddIdentityServer()
                //添加内存的Identity资源
                .AddInMemoryIdentityResources(Config.GetIdentityResources())
                //添加api资源
                .AddInMemoryApiResources(Config.GetApis())
                 //添加clinet
                .AddInMemoryClients(Config.GetClients());

            if (Environment.IsDevelopment())
            {
          //开发环境下使用临时签名凭据
                builder.AddDeveloperSigningCredential();
            }
            else
            {
                throw new Exception("need to configure key material");
            }
        }
        public void Configure(IApplicationBuilder app)
        {
            if (Environment.IsDevelopment())
            {
                app.UseDeveloperExceptionPage();
            }

            // uncomment if you want to support static files
            //app.UseStaticFiles();

            app.UseIdentityServer();

            // uncomment, if you wan to add an MVC-based UI
            //app.UseMvcWithDefaultRoute();
        }
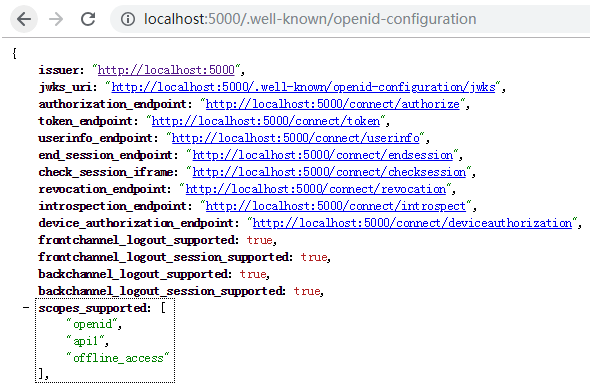
运行服务器并浏览浏览器 http://localhost:5000/.well-known/openid-configuration, 客户端和API将使用它来下载必要的配置数据。下面是截取的部分配置数据:
三. 创建API项目
在解决方案下继续添加API项目,添加ASP.NET Core Web API(或空)模板。将API应用程序配置为http://localhost:5001运行。项目最终目录结构如下所示:

(1) 在API项目中添加一个新文件夹Controllers和一个新控制