-1.4.mar的文件。
因此在调用engageModule语句之间有两种方式来调用你的WEB-INF\modules目录下的addressing-1.4.mar文件。
第一种方式:
ConfigurationContext sysContext = ConfigurationContextFactory

                                       .createConfigurationContextFromFileSystem(

                                                         "D:\\wspace\\Axis2Service\\WebContent\\WEB-INF",

                                                         null);

                    sender = new ServiceClient(sysContext, null);

                            sender.engageModule(Constants.MODULE_ADDRESSING);
第二种方式:
sender = new ServiceClient(sysContext, null);
         sender.engageModule(Constants.MODULE_ADDRESSING);
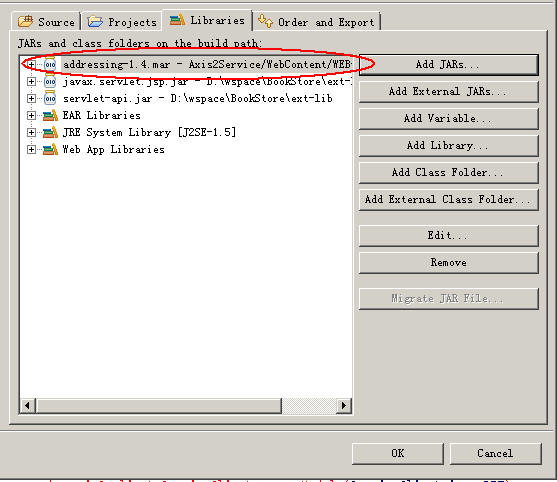
在第二种方式中,不需要为new ServiceClient()指定第一个sysContext参数,但是,你必须把WEB-INF\modules\addressing-1.4.mar指定到你的工程的classpath中去,如下图
要不然运行时会抛出下面这个exception:
org.apache.axis2.AxisFault:Unable to engage module : addressing
下面来看代码,此处的callback我们延用4.2小节中建立的callback接口即可,此处不再重复,直接给出客户端代码:
package org.sky.axis2.helloworld;

import org.apache.axiom.om.OMAbstractFactory;

import org.apache.axiom.om.OMElement;

import org.apache.axiom.om.OMFactory;

import org.apache.axiom.om.OMNamespace;

import org.apache.axis2.AxisFault;

import org.apache.axis2.Constants;

import org.apache.axis2.addressing.EndpointReference;

import org.apache.axis2.client.Options;

import org.apache.axis2.client.ServiceClient;

import org.apache.axis2.context.ConfigurationContext;

import org.apache.axis2.context.ConfigurationContextFactory;

public class HelloWorldWithReturnDualNonBlock {

private static EndpointReference targetEPR = new EndpointReference(

                    "http://localhost:8080/Axis2Service/services/HelloWorld");

public static boolean finish = false;

public void sayHello() {

           OMFactory fac = OMAbstractFactory.getOMFactory();

           OMNamespace omNs = fac.createOMNamespace(

                             "http://helloworld.axis2.sky.org", "");

           OMElement method = fac.createOMElement("sayHello", omNs);

           OMElement name = fac.createOMElement("name", omNs);

           name.setText("ymk");

           method.addChild(name);

           method.build();

           Options options = new Options();

           options.setTo(targetEPR);

           options.setTransportInProtocol(Constants.TRANSPORT_HTTP);

           options.setUseSeparateListener(true);

           options.setAction("urn:sayHello");

           ServiceClient sender = null;

           HelloWorldNonBlockCB callback = new HelloWorldNonBlockCB();

           try {

                    sender = new ServiceClient();

                    sender.engageModule(Constants.MODULE_ADDRESSING);

                    sender.setOptions(options);

                    sender.sendReceiveNonBlocking(method, callback);

                    synchronized (callback) {

                             try {

                                       callback.wait();

                             } catch (InterruptedException e) {

                                       e.printStackTrace();

                             }

                    }

           } catch (Exception e) {

                    e.printStackTrace();

           } finally {

                    try {

                             sender.cleanup();

                    } catch (Exception e) {

                    }

           }

}

public static void main(String[] args) {

           HelloWorldWithReturnDualNonBlock testClient = new HelloWorldWithReturnDualNonBlock();

           testClient.sayHello();

}

}
4.4 运行双工异步客户端前的准备工作
将Axis2的安装目录下的conf目录下(如我的是:D:\opensource\axis\axis2-1.4.1-bin\axis2-1.4.1\conf)的axis2.xml拷贝到你的工程的WEB-INF目录下。
并确保这个axis2.xml里有如下语句:
<moduleref="addressing"/>
运行后显示:

Axis2的双工非阻塞式客户端调用成功!完成Axis2编写Web Service的第一天教