abp(net core)+easyui+efcore实现仓储管理系统目录
abp(net core)+easyui+efcore实现仓储管理系统――ABP总体介绍(一)
abp(net core)+easyui+efcore实现仓储管理系统――解决方案介绍(二)
abp(net core)+easyui+efcore实现仓储管理系统――领域层创建实体(三)
abp(net core)+easyui+efcore实现仓储管理系统――定义仓储并实现 (四)
abp(net core)+easyui+efcore实现仓储管理系统――创建应用服务(五)
abp(net core)+easyui+efcore实现仓储管理系统――展现层实现增删改查之控制器(六)
abp(net core)+easyui+efcore实现仓储管理系统――展现层实现增删改查之列表视图(七)
abp(net core)+easyui+efcore实现仓储管理系统――展现层实现增删改查之增删改视图(八)
abp(net core)+easyui+efcore实现仓储管理系统――展现层实现增删改查之菜单与测试(九)
abp(net core)+easyui+efcore实现仓储管理系统――多语言(十)
abp(net core)+easyui+efcore实现仓储管理系统――使用 WEBAPI实现CURD (十一)
abp(net core)+easyui+efcore实现仓储管理系统――使用 WEBAPI实现CURD (十二)
abp(net core)+easyui+efcore实现仓储管理系统――使用 WEBAPI实现CURD (十三)
abp(net core)+easyui+efcore实现仓储管理系统――使用 WEBAPI实现CURD (十四)
abp(net core)+easyui+efcore实现仓储管理系统――使用 WEBAPI实现CURD (十五)
abp(net core)+easyui+efcore实现仓储管理系统――菜单-上 (十六)
abp(net core)+easyui+efcore实现仓储管理系统――菜单-下(十七)
abp(net core)+easyui+efcore实现仓储管理系统――EasyUI前端页面框架 (十八)
abp(net core)+easyui+efcore实现仓储管理系统――EasyUI之货物管理一 (十九)
通过上一篇文章(abp(net core)+easyui+efcore实现仓储管理系统――EasyUI之货物管理一 (十九) )中,我们已经将创建了货物信息实体 与查询所用到的分页类。下面我们来实现货物信息管理功能所需要的服务类与控制器类,页面呈现。
六、定义ICargoAppService接口
6. 在Visual Studio 2017的“解决方案资源管理器”中,鼠标右键单击“Cargos”文件夹,然后选择“添加” > “新建项”,在弹出对话框中选择“接口”。为应用服务定义一个名为 ICargoAppService 的接口。代码如下。
using Abp.Application.Services; using ABP.TPLMS.Cargos.Dto; using System; using System.Collections.Generic; using System.Text; namespace ABP.TPLMS.Cargos { public interface ICargoAppService : IAsyncCrudAppService<//定义了CRUD方法
             CargoDto, //用来展示货物信息
             int, //Cargo实体的主键
             PagedCargoResultRequestDto, //获取货物信息的时候用于分页
             CreateUpdateCargoDto, //用于创建货物信息
             CreateUpdateCargoDto> //用于更新货物信息
 { } }
七、实现ICargoAppService
7.在Visual Studio 2017的“解决方案资源管理器”中,右键单击“Cargos”文件夹,然后选择“添加” > “新建项”,在弹出对话框中选择“类”。为应用服务定义一个名为 CargoAppService 的服务类。代码如下。
using Abp.Application.Services; using Abp.Domain.Repositories; using ABP.TPLMS.Entitys; using ABP.TPLMS.Cargos.Dto; using System; using System.Collections.Generic; using System.Text; using System.Threading.Tasks; namespace ABP.TPLMS.Cargos { public class CargoAppService :AsyncCrudAppService<Cargo, CargoDto, int, PagedCargoResultRequestDto, CreateUpdateCargoDto, CreateUpdateCargoDto>,ICargoAppService { public CargoAppService(IRepository<Cargo, int> repository) : base(repository) { } } }
八 创建CargoController继承自TPLMSControllerBase
1. 在Visual Studio 2017的“解决方案资源管理器”中,右键单击在领域层“ABP.TPLMS.Web.Core”项目中的Controller目录。 找到TPLMSControllerBase文件,添加一个新的方法JsonEasyUI。此方法的功能是实现对实体对象进行序列化为JSON字符串,并且JSON字符串的格式符合EasyUI的DataGrid要求的数据格式。代码如下。
protected dynamic JsonEasyUI(dynamic t,int total) { var obj= new { total = total, rows = t }; var json = Json(obj); return json; }
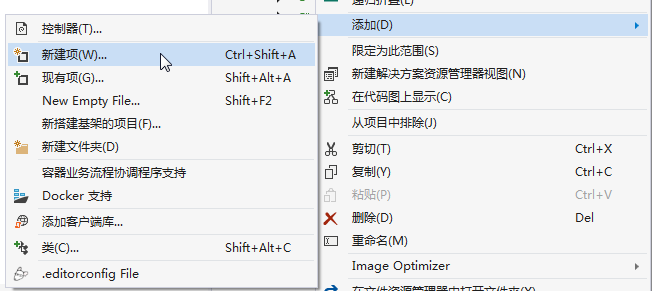
2. 在Visual Studio 2017的“解决方案资源管理器”中,右键单击在领域层“ABP.TPLMS.Web.Mvc”项目中的Controller目录。 选择“添加” > “新建项…”。如下图。
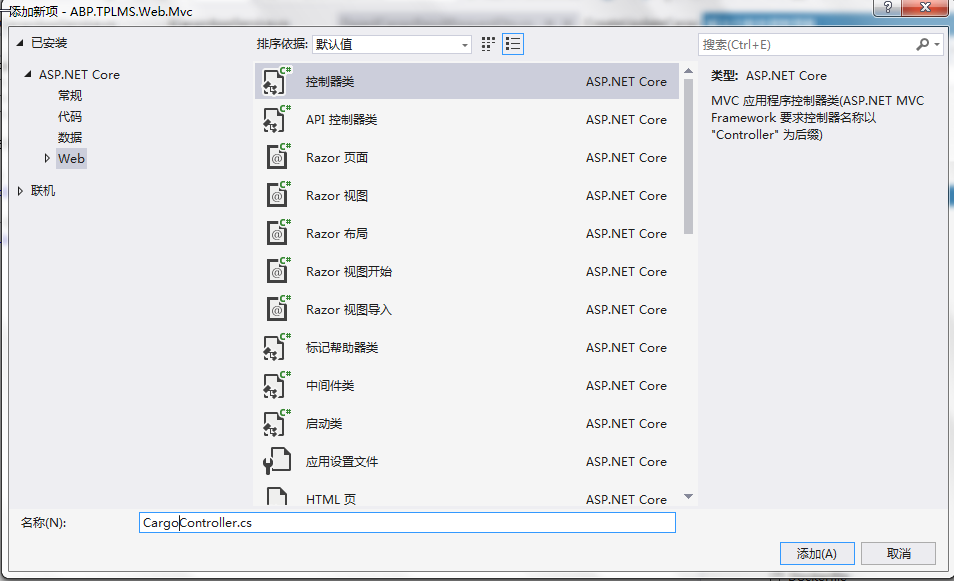
3. 在弹出对话框“添加新项-ABP.TPLMS.Web.Mvc”中选择“控制器类”,然后在名称输入框中输入“CargoController”,然后点击“添加”按钮。如下图。
4.在CargoController.cs文件中输入如下代码,通过构造函数注入对应用服务的依赖。
using System; using System.Collections.Generic; using System.Linq; using System.Threading.Tasks; using Abp.App